
Hot off the computer processing over the weekend, and as a historic first for me only a few days after the Census released them, I’ve updated my GIS data to the 2021 Census Tiger files. There are combined to either the state or national level.
Brian vs the Inspiron 620S
On Memorial Day I can say I had a memorable experience while trying to troubleshoot an old computer we still use. My wife got a Dell Inspiron 620S a while ago to use for her work and what not. Over the years I put a bigger hard drive in it and upgraded it to Windows 10. It’s not the fastest computer, but it still works for my wife’s vinyl cutter program that she uses and some software her work uses that’s Windows only. My kids also periodically use it for older games that they like to play since it’s a Core i5 with a decent low-end Radeon card in it.
A few weeks ago it just stopped working. It would not turn on even though the power supply LED was on and the power LED on the motherboard was lit. Just nothing would happen when you pushed the power button. No hard drive spin ups, nothing. So I let it sit for a while.
On Memorial Day I thought I would finally see what was up with it. I took out my multimeter because my first thought was perhaps the power supply was old and wasn’t producing enough power. I checked the ATX motherboard connector and the always-on pin had power and was the right voltage. I also inspected the motherboard to see if perhaps any capacitors had blown but everything looked fine.
I got up in frustration and thought I’d look online. As I got up, my foot came down on something and then slipped which did bad things to my toes and the muscles/ligaments in my foot and also came close to cutting off my middle toe. I thought it was actually a bit fitting because it was like the computer had found a way to flip me off 😉 Thankfully my wife has been helping me keep my toes buddy taped together and have been keeping stuff on the cut to make sure it heals.
I did finally do some Internet searching and found several other owners complaining on the Dell and other forums about the same issue. They had found that unplugging the two front USB ports from the motherboard fixed their issue. No one has any idea what could be going on and of course I haven’t found anything from Dell admitting to it.
On Saturday we decided to take the kids for ice cream (my wife has been driving lately since it’s hard for me to walk let alone drive). I thought before we left I’d hobble down and just see if unplugging those ports would work. I went to the computer (after making sure there was nothing on the floor around the desk), found the ports on the motherboard and unplugged them. And of course, the computer magically started turning on again. I still don’t know why unplugging them works, but I’m also not going to argue.
I then ran into my next problem. It had been a while since anyone used that computer since it hadn’t been working for several weeks and it wasn’t a priority. I randomly could not log in. My password didn’t work, none of the normal passwords I use around the house worked, no joy. My wife and daughter could log in but I couldn’t. I think it was the angry computer gods giving me one last middle finger.
Fortunately I keep a multi-boot USB handy that has a lot of bootable distributions and utilities. I booted into Kali Linux forensics mode. Once booted all I had to do was open up a terminal, switch to the directory on the Windows drive that had the SAM files, and was able to use chntpw to blank out my password. While there I made sure my account hadn’t been locked out or anything like that. I also booted into several antivirus tools and scanned the hard drive just in case there was a reason my password wasn’t working and did a chkdisk on the drive to make repair the errors from when it stopped working after the power outage.
Things are back to normal with it now and I’ve gotten the updates done that it had been missing. I think my next step is a Catholic priest and some Holy Water just in case!
State-Based 2020 Census Tiger Data Out
Yes, it’s April 2021, and I just now got around to repackaging the 2020 Census Tiger Data at state/national levels. If you’re interested, head over to here.
Hey Why Does My Linux Laptop Keep Waking up?
A couple of weeks ago I got myself a nice cheap laptop that was on sale for Black Friday. However today I noticed that every time I closed the lid and put the laptop aside, it was waking up. Slack was making notification noises when the lid was closed.
First thing I did was check out /proc/acpi/wakeup by running:
grep enabled /proc/acpi/wakeupMy aha moment came when I saw XHC was enabled to wake up the system from a suspend.
XHC S3 *enabled pci:0000:00:14.0The above line in the output says that USB 3.0 (XHCI) devices are able to wake up the laptop. Since I have a USB wireless mouse plugged in, I noticed of course it would roll around after I’d close the lid, thus waking up the laptop.
An easy fix for this is to make a file in /etc/udev/rules.d like the following;
xhc.rules
ACTION=="add", KERNEL=="0000:00:14.0", SUBSYSTEM=="pci", RUN+="/bin/sh -c 'echo XHC > /proc/acpi/wakeup'"For your own system, replace the 0000:00:14.0 with the address given after the pci: output in the above grep.
Now I can close the lid and not have to worry about turning the mouse off first.
When Breaking Up is Hard to Do
Twice now I have had to help women who were in an unfortunate position of having an ex who was more computer savvy and stalked them after the relationship had ended. Both of these cases had several things in common, so thought I would share some advice on what to do before and after a breakup, especially if you are worried your ex will not let things go.
Change your passwords
This cannot be stressed enough. You should change every password you have, including the one you use to log into your computer if you shared it with your ex. It is extremely easy to get passwords out of your web browser, especially if you have not secured your browser or account beforehand.
Use a password manager
You might be tempted to just type in another easy password, but the problem is that your ex may know you well enough that they might be able to guess the types of passwords you might use. (How many people out there use names of pets as passwords for example?) A password manager has the ability to generate random passwords that are basically impossible to guess and are more secure than Fido or his favorite toy. Something like KeePass XC can be run on multiple operating systems, or 1Password that is web browser based.
Enable two-factor authentication
Websites like Google, Facebook, and LinkedIn offer a service called two-factor authentication. This adds a security measure by typically sending a code to your registered mobile number that you have to type in so you can finally be allowed to log in.
Review your online profiles
Changing passwords will not help if your ex is listed as a registered user for your account. Go through all of your online accounts and check your settings, especially in areas such as recovery email addresses and phone numbers. If your ex is listed here, they could find a way to get access to your online accounts again.
While you are checking your settings, also take some time to check what applications have access to your online account and things like what your account recovery questions are. Your account recovery questions are important because your ex could know enough about you to call in and use them to get access to your account.
Wipe your mobile device
This might sound drastic, but it is easy these days for someone to install software on a mobile device that gives them remote access to read your personal data on the phone. The easiest way to solve this is to do a complete factory reset of your mobile device. Yes, it might be annoying, but if you think you are are might be stalked, it is a good way to make sure your device is private. If you are uncomfortable doing this yourself, you should be able to take it to the place you got the device or a computer store to have it done.
If you do this, take care to NOT restore a backup of your device. The backup could have the spyware in there so you would end up right back where you started.
Have your computers checked
Similar to your mobile devices, your laptop or desktop computers should be checked to see if any spyware was installed. Sometimes this can be done by having a professional boot from a USB device and scan your drives. However, it also could be best to have someone zero out your drives and reinstall your operating system. Again, there is a caveat here to not restore from a full-drive backup as spyware is likely included in that backup.
Internet cameras
Many people have things like Ring doorbells or nanny cams in their houses. The problem with these is that they are often times Internet-enabled and thus can be remotely accessed by your ex to spy on you. You should most definitely change passwords on these devices, and call the companies to make sure you change any account recovery options. Or, simply remove them if you feel you are still being spied on. It also is a good idea to go around and check your house to see if there are any cameras you might not know about.
Change your router password
If you have Internet access at your house, your ISP (Verizon, Comcast, etc) likely gave you a router that also provides you with wireless Internet access. These devices have several passwords that should be changed. First is your wireless access password. If your ex had access to your home wireless, they still will until you change that password. Until it is changed, your ex could simply sit near your house, connect to your wireless, and snoop on everything you do online.
There is also an administrative password on your home router that should be changed. This allows someone to log into the router to make changes to things. Many of these devices have default known passwords, or the password is printed on a sticker on the device. Your ex could use this to log in and give themselves access to your home network.
If you are not sure how to do this, call your ISP and they should be able to help you. Additionally, check out this article and this one as well for things you can do in general to keep your home internet safe.
How to get help
You should be able to call your ISP or local computer places to get help in doing these things if you are unsure how to do it yourself. Additionally, contact us at info@digitalmaddox.com and we will be happy to talk to you about your specific situation.
More Fun with the RTX 2060
So I recently wiped my system and upgraded to Linux Mint Cinnamon 20. I tend to wipe and install on major releases since I do a lot of customization.
Anyway, I wanted to set CUDA back up along with tensorflow-gpu since I have stuff I wanted to do. I recreated my virtual environment and found Tensorflow 2.2.0 had been released. Based on this I found it still needs CUDA 10.1. No worries, went through and put CUDA 10.1, cuDNN, and TensorRT back on my system and everything was working.
I noticed with 2.2.0 that I was getting the dreaded RTX CUDA_ERROR_OUT_OF_MEMORY errors for pretty much anything I did. So I fixed it and figured I’d post this in case it helps anyone else out down the road. You need to add this in so that the GPU memory can grow and use mixed precision with the RTX (which also helps to run things on the TPUs in the RTX series).
from tensorflow import config as tfc
from tensorflow.keras.mixed_precision import experimental as mixed_precision
...
gpus = tfc.experimental.list_physical_devices("GPU")
tfc.experimental.set_memory_growth(gpus[0], True)
policy = mixed_precision.Policy('mixed_float16')
mixed_precision.set_policy(policy)
If you’re having more out of memory errors on your RTX, give this a shot. You can read more about Tensorflow and mixed precision here.
Fun with Linux and a RTX 2060
Or…. how to spend a day hitting your head into your desk.
Or…. machine learning is easy, right? 🙂
For a while now I have been wanting to upgrade my video card in my desktop so I could actually use it to do machine/deep learning tasks (ML). Since I put together a Frankenstein gaming computer for my daughters out of some older parts, I finally justified getting a new card by saying I would then give them my older nVidia card. After a lot of research, I decided the RTX 2060 was a good balance of how much money I felt like spending versus something that would actually be useful (plus the series comes with dedicated Tensor Cores that work really fast with fp16 data types).
So after buying the card and installing it, the first thing I wanted to do was to get Tensorflow 2.1 to work with it. Now, I already had CUDA 10.2 and the most up-to-date version of TensorRT installed, and knew that I’d have to custom compile Tensorflow’s pip version to work on my system. What I did not know was just how annoying this would turn out to be. My first attempt was to follow the instructions from the Tensorflow web site, including applying this patch that fixes the nccl bindings to work with CUDA 10.2.
However, all of my attempts failed. I had random compiler errors crop up during the build that I have never had before and could not explain. Tried building it with Clang. Tried different versions of GCC. Considered building with a Catholic priest present to keep the demons at bay. No dice. Never could complete a build successfully on my system. This was a bit to be expected since a lot of people online have trouble getting Tensorflow 2.1 and CUDA 10.2 to play nice together.
I finally broke down and downgraded CUDA on my system to 10.1. I also downgraded TensorRT so it would be compatible with the version of CUDA I now had. Finally I could do a pip install tensorflow-gpu inside my virtual environment and and it worked and it ran and I could finally run my training on my GPU with fantastic results.
Almost.
I kept getting CUDNN_STATUS_INTERNAL_ERROR messages every time I tried to run a Keras application on the GPU. Yay. After some Googling, I found this link and apparently there’s an issue with Tensorflow and the RTX line. To fix it, you have to add this to your Python code that uses Keras/Tensorflow:
from tensorflow.compat.v1 import ConfigProto
from tensorflow.compat.v1 import InteractiveSession
...
 config = ConfigProto()
 config.gpu_options.allow_growth = True
 session = InteractiveSession(config=config)
FINALLY! After several days of trying to custom compile Tensorflow for my system, giving up, downgrading so I could install via pip, running into more errors, etc, I now have a working GPU-accelerated Tensorflow! As an example, running the simple additionrnn.py example from Keras, I went from taking around 3.5 seconds per epoch on my Ryzen 7 2700X processor (where I had compiled Tensorflow for CPU only to take advantage of the additional CPU instructions) to taking under 0.5 seconds on the GPU. I’m still experimenting, and modifying some things to use fp16 so I can take advantage of the Tensor Cores in the GPU.
Tiger 2019 Data Uploaded
I’ve uploaded my state-based versions of the Census Tiger 2019 datasets. Use at your own risk, yadda yadda. See the GIS Data page above.
Revisiting Historic Topographic Maps Part 2
Reply
In part one I discussed how I go about finding and downloading maps from the USGS Historic Topomap site. Now I will show how I go through the images I downloaded in Part 1 and determine which ones to keep to make a merged state map. I will also show some things you may run into while making such a map.
Now that the maps are all downloaded, it is time to go through and examine each one to determine what to keep and what to digitally “throw out.” When you download all the historic maps of a certain scale for a state, you will find that each geographic area may have multiple versions that cover it. You will also find that there are some specially made maps that go against the standard quadrangle area and naming convention. The easiest way for me to handle this is to load and examine all the maps inside QGIS.

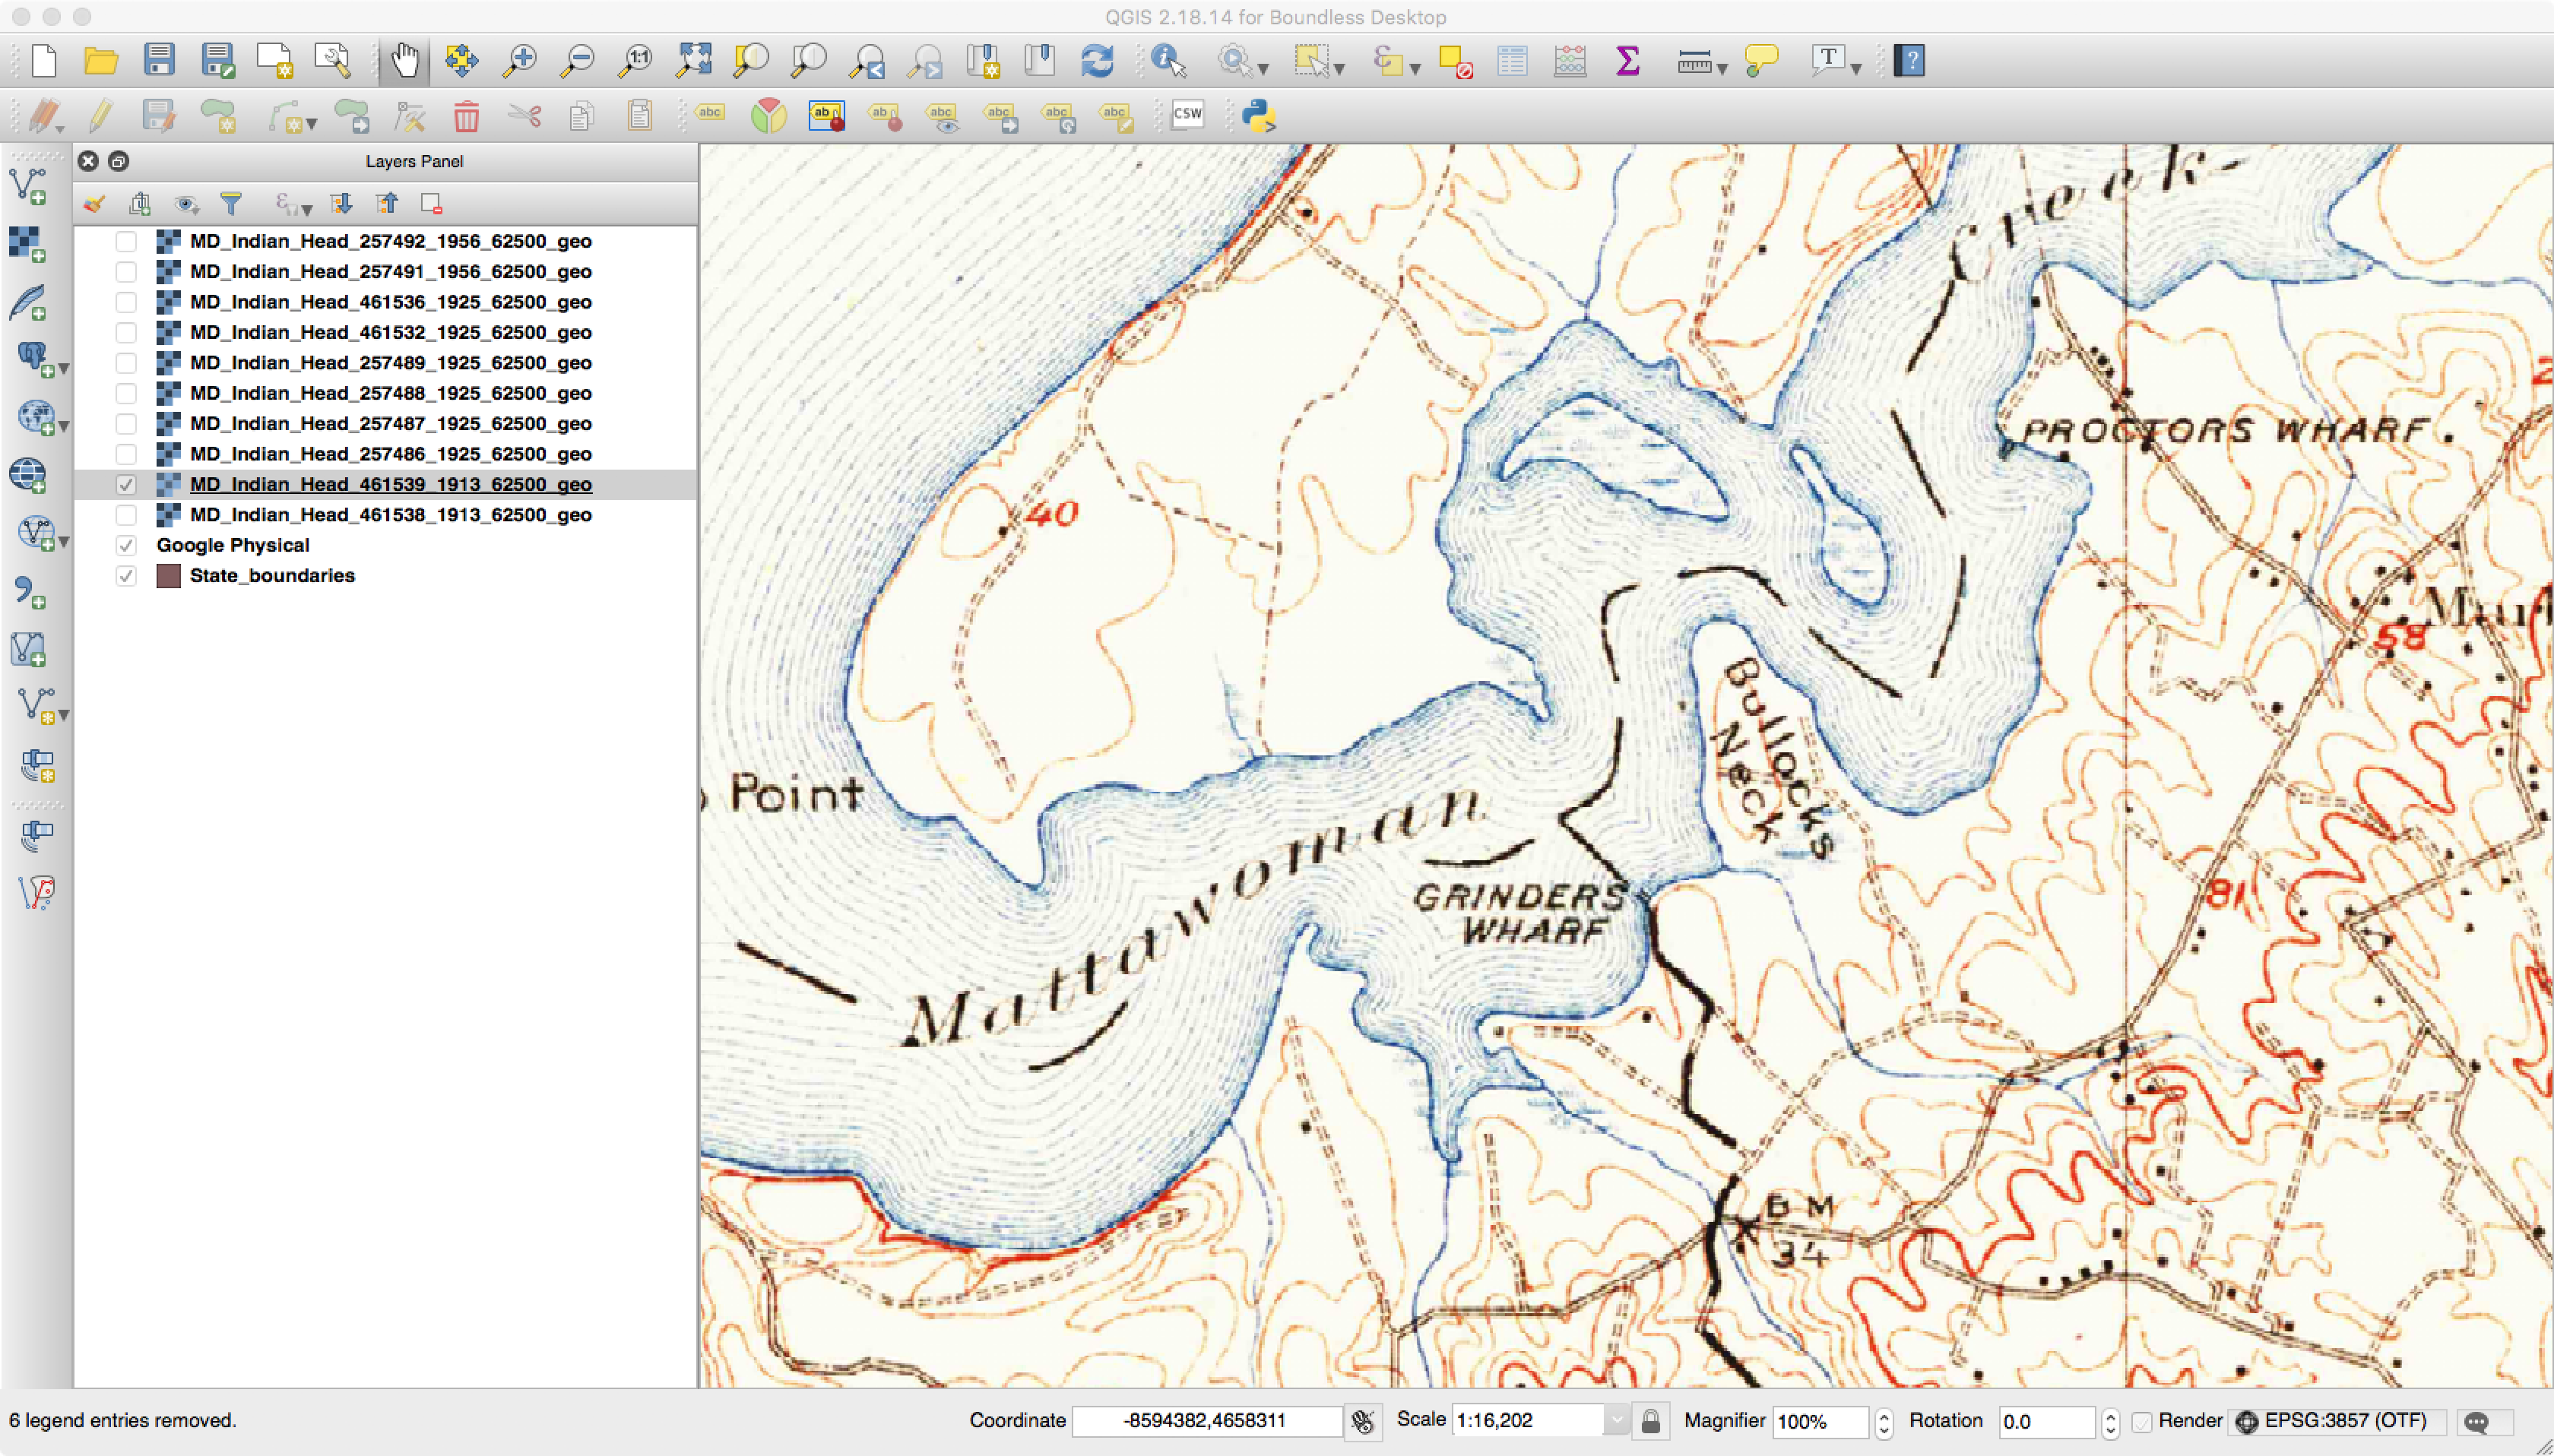
Using QGIS to Check an Image
I load the maps that cover a quadrangle and overlay them on top of something like Google Maps. For my purposes, I usually try pick maps with the following characteristics:
- Oldest to cover an area.
- Good visual quality (easy to read, paper map does was not ripped, etc)
- Good georeferencing to existing features
QGIS makes it easy to look at all the maps that cover an area. I will typically change the opacity of a layer and see how features such as rivers match existing ones. You will be hard-pressed to find an exact match as some scales are too coarse and these old maps will never match the precision of modern digital ones made from GPS. I also make sure that the map is not too dark and that the text is easily readable.
One thing you will notice with the maps is that names change over time. An example of this is below, where in one map a feature is called Bullock’s Neck and in another it is Bullitt Neck.
Feature Named Bullock’s Neck

Feature Named Bullitt Neck
Another thing you will find with these maps is that the same features are not always in the same spots. Consider the next three images here that cover the same area.

Geographic Area to Check for Registration

First Historic Map to Check Registration

Second Map to Check Registration
If you look closely, you will see that the land features of the map seem to move down between the second and third images. This happens due to how the maps were printed “back in the day.” The maps were broken down into separates where each separate (or plate) contained features of the same color. One contained roads, text, and houses, while another had features such as forests. These separates had stud holes in them so they could be held in place during the printing process. Each separate was inked and a piece of paper was run over each one. Over time these stud holes would get worn so the one or more would move around during printing. Additionally, maps back then were somewhat “works of art,” and could differ between who did the inscribing. Finally, depending on scale and quality of the map, the algorithms to georeference the scanned images can result in rubber sheeting that can further change things.
During my processing, one of the things I use QGIS for is to check which maps register better against modern features. It takes a while using this method but in the end I am typically much happier about the final quality than if I just picked one from each batch at random.
Another thing to check with the historic maps is coverage. Sometimes the map may say it covers a part of the state when it does not.

Map Showing No Actual Virginia Coverage
Here the map showed up in the results list for Virginia, but you can see that the Virginia portion is blank and it actually only contains map information for Maryland.
Finally, you may well find that you do not have images that cover the entire state you are interested in. If you group things by scale and year, the USGS may no longer have the original topomaps for some areas. It could also be that no maps were actually produced for those areas.
Once the images are all selected, the images need to be merged into a single map for an individual state. For my setup I have found that things are easier and faster if I merge them into a GeoTIFF with multiple zoom layers as opposed to storing in PostGIS.
Here I will assume there is a directory of 250K scale files that cover Virginia and that these files have been sorted and the best selected. The first part of this is to merge the individual files into a single file with the command:
gdal_merge.py -o va_250k.tif *.tif
This command may take some time based on various factors. Once finished, the next part is to compress and tile the image. Tiling breaks the image into various parts that can be separately accessed and displayed without having to process the rest of the image. Compression can make a huge difference in file sizes. I did some experimenting and found that a JPEG compression quality of eighty strikes a good balance between being visually pleasing and reducing file size.
gdal_translate -co COMPRESS=JPEG -co TILED=YES -co JPEG_QUALITY=80 va_100k.tif va_100k_tiled.tif
Finally, GeoTIFFs can have reduced-resolution overview layers added to them. The TIFF format supports multiple pages in a file as one of the original uses was to store faxes. A GIS such as QGIS can recognize when a file has overlay views added and will use them first based on how far the user has zoomed. These views usually have much fewer data than the full file and can be quickly accessed and displayed.
gdaladdo --config COMPRESS_OVERVIEW JPEG --config INTERLEAVE_OVERVIEW PIXEL -r average va_100k_tiled.tif 2 4 8 16
With the above command, GDAL will add an overview that is roughly half sized, quarter sized, and so on.
In the end, with tiling and compression, my 250K scale merged map of Virginia comes in at 520 megabytes. QGIS recognizes that the multiple TIFF pages are the various overviews and over my home network loading and zooming is nearly instantaneous. Hopefully these posts will help you to create your own mosaics of historic or even more modern maps.
Tiger 2018 Data Uploaded
I’ve updated my datasets to the 2018 release of the Census Tiger Data. You can find them here.