In this installment, we will look at setting up a geospatial database to store your data. This is not a long post, but the first where you can get your feet wet, so to speak. If you are going to do anything more than just look at a data layer or two, you will want to set up a database. Some vector data sets can be huge (several hundred gigabytes in fact), and opening them in a GIS can take forever. Even if you only want to look at a small part of a file, applications will have to scan through all the data to get to the part you want. Some data sets such as Shapefiles allow you to create index files to help locate the data faster, but you will likely want the added functionality that a spatial database gives you.
The biggest advantage of having a spatial database is that it does a better job of indexing and analyzing the data and stores it for faster access. When your application requests an area, the database will send back only the data covering that area, which will greatly speed up access and processing. Databases can physically sort the data so that features close to each other are stored in the same areas on disk as well.
I am going to describe PostGIS here, mainly because it is the geospatial database I use on a regular basis. Most Linux distributions should have a fairly recent version of the software in their repositories. My Fedora 19 system has version 2.0.3 of PostGIS from the Fedora- and 9.2.5 of PostgreSQL from the updates-testing repositories. Based on your distribution, you should find it in your GUI-based package manager or by running commands such as yum search postgis or apt-cache search postgis from the command line. On Windows, head to http://postgis.net/windows_downloads to find an installer for your platform. You can find install information at http://postgis.net/docs/postgis_installation.html. Again, I am not going to duplicate their instructions here. They spent a lot of time writing it up, so you can read how to install there 🙂 Note that I HIGHLY recommend that you use PostgreSQL 9.1 or later. Version 9.1+ makes it much easier to create a spatial database than previous versions and adds some additional speed benefits.
Depending on how PostGIS was packaged for your system, you might already have a template geospatial database installed. If not, you will want to create one using the instructions found in the postgis_installation link above. Basically, if you are using PostGIS with PostgreSQL 9.1 and above, run the following from a command line:
createdb gis_templatedb
psql -d gis_templatedb -c "CREATE EXTENSION postgis;"
psql -d gis_templatedb -c "CREATE EXTENSION postgis_topology;"
Additionally, if you plan on loading an older database table, run:
psql -d gis_templatedb -f legacy.sql
The above commands create a database and load the geospatial functions from PostGIS into it. These functions allow the database to store spatial data and perform operations such as find all the points nearest to this one and let you search for specific data using SQL operations. The reason you want to have a database template is simple: it makes it much easier to create other geospatial databases. With a template you just have to run a command such as createdb -T my_template_database my_gis_data. Otherwise, you would have to run all of the above commands each time.
Once you have followed the installation instructions from the PostGIS website and have a template in place, you are ready to move on to testing it to make sure everything is OK. Download and unzip this file somewhere on your system. It is a Shapefile I made of four cities in Virginia. We will use it to test your geospatial database and show you how to load data from it into QGIS.
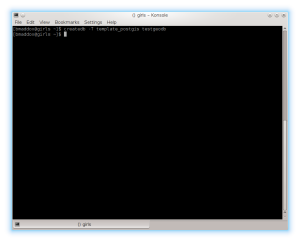
First, create your geospatial database. Run createdb -T gis_templatedb testgeodb to create your first real geospatial database. If you get any errors, first make sure PostgreSQL is running and then head to the troubleshooting sections of the PostgreSQL website. If it worked correctly, the command will simply return as shown below.
PostGIS comes with two versions of a utility to load Shapefile data: shp2pgsql and shp2pgsql-gui. Respectively, the first runs from the command line and you must pass it options to select items such as the EPSG code and the second is a full GUI that lets you click to select your options. As this is a simple Shapefile, we will use the GUI version so you can get some experience loading data.
Find the shp2pgsql-gui command on your system. On Windows it should be under the PostgreSQL menu entry. Under Linux it should be installed to /usr/bin/shp2pgsql-gui. Currently (11/29/2013), if you are running Fedora 19, the PostGIS RPMS contain a broken copy of shp2pgsql and shp2pgsql-gui. You can click here to download fixed RPMS I made that will update PostGIS on your system. The file is a zipfile with the RPMS. Run unzip postgisfixed.zip from a shell to extract the files and then change to the postgisfixed directory. Run rpm -Fvh * as root from the directory to upgrade your copy of PostGIS.
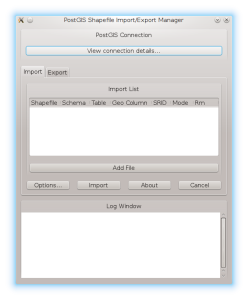
When you run shp2pgsql-gui, it should look like this:
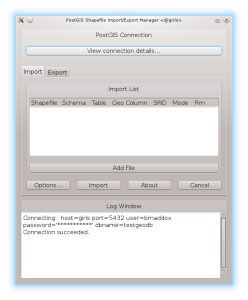
The first step is to click the “View connection details” button under the PostGIS Connection label. You will be presented with a window where you can enter in your connection options. Type in your database options and click the OK button. You should see something similar to the below picture showing that your database connection succeeded.
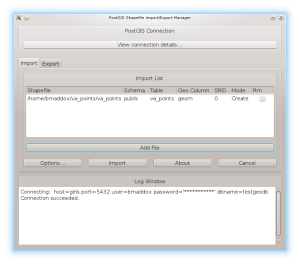
Now load the Shapefile into shp2pgsql-gui. Click the Add File button and navigate to where you unzipped the va_points.zip file. Click on the va_points.shp file in the sub-directory and shp2pgsql-gui should look similar to the following screen shot.
Before you click the import button, you will likely need to change a few options. Shp2pgsql/shp2pgsql-gui always default to a 0 for the SRID (Spatial Reference system IDentifier). This number specifies the European Petroleum Survey Group (EPSG) code that denotes the coordinate system of the source data. In the case of va_points.shp, double click under SRID and enter in 4326. This code stands for WGS84, which is the projection I used when I created the Shapefile. Once you have done this, click the Import button. Shp2pgsql-gui will pop up a status window and then give you a Shapefile Import Completed message as shown below. That is it, your data should be in your database. If you get any errors, double check the connection parameters and try again. If it still does not work, check the troubleshooting sections on the PostGIS website.
Next time, we will go over installing QGIS so you can look at the data you just imported into your database.


