Some Background on Natural Language Processing – Part 2: Older Methods and Techniques

Last time we learned why English is a hard language, both for humans and especially for computers.  For this time I think we will look at the past of NLP to understand the present. It actually has been an interesting history to get to where we are now.

Historic NLP methods relied on approaches that focused more on linguistics and statistical analysis.  Computers were not as powerful as they are now, and definitely did not have GPUs with the crazy amount of processing capability that they have now.  They can be broadly grouped into six categories: rule-based systems, bag of words, term frequency-inverse document frequency, n-grams, Hidden Markov Models, and Support Vector Machines.  Let us explore these methods to see how they worked and led to today’s more powerful systems.  This post will have a lot of links to other sources of information as it is intended to be more of a gentle introduction than an exhaustive analysis.

Rule-Based Systems

Rule-Based Systems are perhaps the oldest method of trying to get a computer to be able to process a language.  These systems were built on predefined linguistic rules and handcrafted grammars.  Grammar in this case is not about usage, such as matching nouns and verbs and what not.  In this case the grammar is known as a formal grammar that is a mathematical structure of a sentence.  One specific method is a context-free grammar that has a set of rules of how to form sentences from smaller words and phrases.

Rule-based systems explicitly encode language in a series of rules so that text can be parsed.  This parsing would then be able to identify parts of speech and identify sentence structure.  These rules were typically created by linguists and software developers working together to try to codify language as a series of mathematical rules.

The rules they would create were simple so that they could be combined together for more complex sentences.   For example, one rule could be “any word that ends in ing is likely a verb”, while another could be “a noun follows determiner words such as a, then, and an.”  The developer would then take these rules to create a parser to take in sentences and break them down into their syntactic components using the mathematically-defined grammars.

Since I am a cat person, let us look at this very simple example sentence: “My cat is playing with a toy.”  In this case, the would be tagged as a determiner words, so cat would be tagged as a noun.  Is playing would be identified as a verb.  A is another determiner word, so toy would be tagged as another noun.

While this sounds simple, these systems were complex and labor intensive.  They required the work of expert linguists and developers to build the parsing systems.  They required a lot of maintenance as problems were found and the rules needed to be modified.  As they were based on formal mathematics, they were not very flexible when it comes to something sloppy like English.  This meant that rules after rules would have to be developed and stacked on top of one another.

Bag of Words

The Bag of Words (BoW) method was an early attempt at applying statistical processing to NLP.  It sought to represent text in a numerical form so that statistical algorithms could be applied.  These algorithms could then do things like classify documents or determine the similarity of two different documents.

The BoW method works by treating the input text as an unordered collection of words.  In this case, however, neither the order of words nor the sentence grammar are used.  The document is tokenized, where the words are converted into tokens.  A list of each unique token is then created.  The input text is analyzed and each word is counted to determine the frequency of occurrence in the document.  The document is then converted into a vector of word frequencies that is the same size as the number of unique words in the document.

You may know vectors from geometry where they represent lines and their direction.  It is still similar in this case where it is a mathematical array of numbers.  In the case of a frequency representation, the array could look something like [10, 5, 3, 9] and so on, where each number represents the frequency a word appears.

For computing document similarity, both documents would be turned into frequency vectors by enumerating their unique words and then creating a vector that is the same length as the total number of unique words.  The frequencies of each word are inserted into the array, with a zero placed in locations where a word occurs in one document but not in the other.  The order of the word frequencies of the array can be sorted so each array entry corresponds to the same one in the other document.

The comparison is easier to think of back in terms of geometry.  There are two methods to compute the distance between the vectors: cosine similarity and Euclidean Distance.  For cosine similarity, the cosine of the angle between the two vectors in multidimensional space is calculated with the result being between -1 and 1.  A value of 1 means the vectors are identical, 0 means they are orthogonal to each other (not similar), and a -1 means they are very different from each other, and other values are between one of the three.

Euclidean Distance calculates the straight-line distance between each point in the vectors in Euclidean space (told you geometry would come into it).  The distance metric is actually based on the Pythagorean Theorem that you may remember from high school.  The output of this is a vector that is the same length as the document vectors and each entry is the distance between the corresponding points.  The smaller the distances, the more similar the documents are.

While BoW is good for things like document similarity, it has several drawbacks when compared to other NLP techniques.  For one, since it just deals with statistical frequencies, it ignores things such as order of words and their context.  This means there is no real semantic information that is carried over.  The other drawback is that for large documents that are very different, the generated vectors can be largely empty and become cumbersome for distance computation algorithms.

Term Frequency-Inverse Document Frequency

Term Frequency-Inverse Document Frequency (TF-IDF) came about as an improvement on the BoW concept by weighing words based on importance in a document relative to a larger group of documents.  It attempts to identify significant words in a document while ignoring common words that frequently occur, such as the, and, but, and so on.

To understand how it works, let us break down the various parts of how it works.  The first part is the Term Frequency (TF).  As it sounds, this is a measure of how frequently a word appears in a document.  Thus words that occur more will have a higher score.  


The next part of the calculation is the Inverse Document Frequency (IDF).  This equation is a measure of how often a word occurs across the entire set of documents.  Words that do not appear often are assigned a higher score.


Now we multiply the two values together to come up with the TF-IDF value.


This value reflects how “important” a word is in a document relative to the total number of documents.  Word that occur often in one document but not in the total number of documents would end up with a high TF-IDF score.  This can be use to filter out the common words I mentioned above.

TF-IDF also has several drawbacks when it comes to NLP.  For one, it still ignores word order and the context in which words are used.  As previously mentioned, word order and context are very important when attempting to determine the actual meaning of a word and how it is used.

This leads into the next issue with TF-IDF.  Without context, it fails to account for words that mean the same thing.  Consider something like dog and puppy.  TF-IDF would treat them as different words instead of recognizing they are similar.

N-Grams

N-Grams were created to try to address the limitations of lack of word context.  They consider sequences of words to preserve word order versus looking solely at single words.  This consideration made N-Grams popular for modeling textual language and actual text generation.

An N-Gram is defined as a contiguous sequence of N items that are in text.  Consider the example sentence of “The cat sleeps on the chair”.  A unigram (1-Gram) would be a single word such as “The” and “cat”.  A bigram (2-Gram) is a sequence of two words, such as “The cat” and “cat sleeps”.  A trigram (3-Gram) is then a sequence of three words, such as “The cat sleeps” or “cat sleeps on”.  This continues on for larger numbers of N and counts the frequency that these sequences occur in a text.  As such, the higher the value of N, the more context is captured from the text.

You might immediately see a problem with N-Grams.  As the value of N increases, the number of possible word sequences goes up nearly exponentially.  For example, a vocabulary of V would have approximately VN N-Grams.  This makes the model much harder to train when there is a limited amount of text.  Higher values of N also can cause a smaller number of matches across documents.  N-Grams still fail to capture dependencies across sentences as they only capture localized context.

Hidden Markov Models

Hidden Markov Models (HMMs) were used quite a bit (and periodically used today) for NLP tasks like part-of-speech tagging and named entity recognition (NER).  They are probability models that represent the sequence of hidden states that exist in systems that are based on observable events.

A HMM consists of several parts:

  • Hidden States represent the phenomena of a system that are unobservable.  In relation to NLP, these hidden states could be parts of speech.
  • Observations are the words or their tokenization from text that are observed directly.
  • Transition probabilities are the probability of moving from one hidden state to another.  In NLP, nouns are usually followed by verbs, so that the probability of going from a noun to a verb is very high.
  • Emission probabilities are the probabilities of observing a particular word given a particular hidden state.  For example, if the hidden state is a verb, then the probability of the word sleep given the verb state would be high.

HMMs work by assuming that the system being modeled (not necessarily just for NLP work) is a Markov Process.  Put simply, a Markov Process means that the probability of each state depends only on the previous state.  With respect to NLP, the hidden states can be considered to represent parts of speech, such as nouns and verbs.  The observed events of the system would be the words themselves.  A HMM then uses the above probabilities to model the sequence of hidden states that most likely produced the observable text.

HMMs require training data to be able to predict the parts of speech in a sentence.  This is also their drawback in that they require manually labeled training data to be able to estimate probabilities.  

Support Vector Machines

The last “old school” NLP technique we will discuss is Support Vector Machines (SVM).  They were one of the first machine learning algorithms used for classification tasks.  SVMs were useful for tasks such as sentiment analysis and spam detection.  Much like machine learning tasks today, they worked by finding a hyperplane that separates different classes in high-dimensional spaces (yes this is hard to wrap your mind around, I would suggest reading the links to learn more).

Machine learning is based on vectors, or arrays of values.  SVMs are no exception.  They work by encoding the text document as a numerical vector such as TF-IDF values or others.  They then search to find an optimal plane / boundary that can completely separate multiple classes (for example, text that speaks positively about something versus negatively about it).  Kernel functions were used in cases where the plane that separated the classes was non-linear.  They would map the input space into another space that would allow the classes to be divided by a hyperplane.  This early machine learning method was very useful for classification tasks.

While they were good for classification tasks, they were not good at modeling sequences or structures in texts.  Outside of classification they did not really perform as well.  As is often the case with machine learning, large scale datasets were computationally expensive to train.

Conclusion

This basically sums up some of the classification methods for NLP.  You can see how things developed from statistical analysis to the beginnings of machine learning.  These methods were good at some things, but failed to capture the complexity and context of languages.  They heavily relied on preprocessing steps such as tokenization, common and stop word removals, manual labeling, and so on.  These steps could be time consuming and still not capture meaning.

The move to more machine learning methods would finally enable better handling of ambiguity and context in various languages.  Next time we will close with modern techniques at NLP and how they have created a revolution in processing human languages.  

Some Background on Natural Language Processing – Part 1: English

I thought I would switch topics and start to talk about things like Large Language Models and how they could be applied to things like Geographic Information System (GIS) data.  To do this, I think first it would be good to talk about the basis for some of these tools, such as natural language processing (NLP).  

NLP is the basis for tools such as LLMs and even the ability to extract information from GIS data such as people, places, and things.  As such, I feel it is important to understand NLP as it provides a lot of value to GIS information as well as advanced processing of such information.

Some background about English

Before I dive into how NLP works, I first want to talk about the English language and how it relates to NLP.  This will give some background about why NLP is hard and how far we have come over the years.  So we will have a bit of a history lesson.  I love history and I finally have a reason to blog about it.  Next post we will dig into the background of how NLP used to work and how it works today.

What is the English Language?

First off, English is a horrible language.  It is a West Germanic language that is a part of the Indo-European language family.  It is a mashup of several different languages and continues to evolve almost yearly with new terms being added.  It got its start in what is now the UK prior to the fifth century when it was inhabited Celtic-speaking peoples.  Then came the Romans who tried to enforce Latin, but the natives said no for the most part.

Old English

Next came the Anglo-Saxons who came to Britain from the area around the northwest of modern Germany.  These Anglo-Saxon travelers brought their Ingvaeonic languages to Britain, displaced the Celts, and then started what we now call Old English.  Then while Old English was forming, we throw in some influence form the Vikings who invaded off and on and imparted some of their Norse words into the mix.  Then, to top things off, we had four known variants of the language that developed in Britain.

An example comes from Beowulf what was written around 1000 AD and here is the first line of it:

HWÆT:  WE GAR-DENA IN GEARDAGUM (So. The Spear-Danes in days gone by)

Middle English

Then came the Normans in 1066.  The Normans at the time spoke Anglo-Norman / Anglo-Norman French / Old French.  This became the language of the upper class and the courts of the time.  English then brought in some of the French words to add to the mix.  However, this did simplify the grammar of the language a bit.  This then went on to give us Middle English.  An example of this is found in The Canterbury Tales, where one of my high school English teachers made us memorize the first verse of it and scarred me for life.

Whan that Aprill with his shoures soote (When April with its sweet-smelling showers)

Early Modern English

Then we move on to Early Modern English that started to take root in the 15th to 17th centuries, better known as the Renaissance.  Here we decided to throw in some Latin, Greek, and even more French words for good measure.  The good news is that we started to simplify the grammar even more.  During this time, English went through the Great Vowel Shift.  This change modified how long vowels were pronounced and thus threw in some spelling changes.  The results of this shift have had wide-ranging impacts, including the basis for spelling and pronunciation mismatches in Modern English.  Plus the English and French began their love/hate relationship so it is possible that some anti-French sentiment caused some words to be modified to lose their influence, so to speak.  This was also the language used by Shakespeare who also added words to the language.  Here is an example of what the Lord’s Prayer would have looked like during this period.

Our father which art in heauen, hallowed be thy name. Thy kingdome come. Thy will be done, in earth, as it is in heauen.

Modern and Contemporary English

We finally arrive at Modern English which started in the 17th century and continues on today.  Thanks to the British Empire, English spread globally.  This global contact ended up adding more word to the language.  It went on to become the language of business, science, and diplomacy.

Then you may have heard of a bit of a spat between the British and a bunch of upstart colonies that formed the United States.  As time went on, American English began to differ a bit from British English, mainly in some spellings and different words for things (a car’s hood vs a car’s bonnet).  As the empire fell, we also got various dialects of English including Canadian and Australian English.

A Language that Confuses Native Speakers

This brings us to Contemporary English, a language with a large history of change and influences and words from various cultures.  Unlike Latin-based languages, it really does not follow many rules.  It tends to reuse words with different tenses and even different parts of speech.  The same word can have a lot of different and even non-related meanings.  Consider this, a perfectly valid sentence today:

I banked(1) on the advice from my friend and ended up making a lot of bank(2) by playing the bank(3) of slot machines at the casino.  To keep it safe, I decided to take it to the new bank(4) that they built on the south bank(5) of the river.

As a native American English speaker, this makes me want to cry.  This is why it is so hard for non-native English speakers to learn the language.  Let us look at the abomination that I just wrote.  The word bank is used as a:

  1. Verb: meaning to rely on
  2. Noun (slang really): meaning money
  3. Noun: meaning a row of similar items
  4. Noun: meaning a place to store things for later use
  5. Noun: sloping raised land near a river

Imagine you are someone trying to learn English and you come across that sentence.  Your head would explode.  Think about how hard it would be to figure out what was actually being said.  Note that I could have added another verb use by saying something like “On the way there, I had to bank to the left in my car to get in the proper lane.”  Thankfully I felt bad enough making the above sentence in the first place.

Now imagine a computer trying to parse this.  Remember that a computer is a glorified calculator.  Admittedly that sentence was made up to be a specific edge case, but it illustrates the point that if a human would have trouble understanding something, you can be sure that I computer will too.  And NLP has come a long way and these days would actually be able to make use of that sentence.

Distinguishing the meaning of the same word used in many different contexts has been, and continues to be, one of the primary reasons that getting NLP right has been so hard.  We have ended up with many historic and structural complexities that have led to the language today. 

Historically, most NLP research has been done on the English language due to its dominance in commerce and the link.  NLP into other languages is working to catch up, but for these blog posts I am going to consider that to be out of scope since, well, I do not speak those languages.

And to add in another complication, research and methods of NLP for the English languages do not exactly work well for other languages.  Each language has its own grammar and usage.  Some languages such as Spanish and French (Romance Languages) are similar at least.  But it is basically an apples to oranges comparison to try to apply English NLP principals to something like an Asian language.

Conclusion

I think I will leave things here for today.  Next time I will go into the history of how NLP worked in the past before moving on to how it works today.

Saying Goodbye to my Census Tiger Data

For a long time now I’ve maintained a version of the Public Domain Census Tiger Data converted from county-level to state-level.  Over the years I’ve actually had a lot of those shape files downloaded so I’m glad they were useful to some people!

However, the Census is now putting out geopackages of there data at both the national and state levels.  I’d also like to thank the US Census for doing that as I think state-level data is way more usable than county level!

As a result, I think there’s not really a reason for me to host the state-level data any more.  I’ll still host the script to download and create a PostgreSQL/PostGIS database at my github repo, and might even get around to adding scripts to automatically process the geopackages.

So, so long my state-level Census data and thanks for all the fish!

How I Got TensorFlow and PyTorch working on an Intel Arc A770 GPU

7 Nov 2024 Edit: Updated the command to install Pytorch.

22 Dec 2024 Edit: Updated and simplified the software install as there are aliases now.

Note: It’s much easier if you upgrade your environment to just nuke the conda install and recreate it if/when new versions of the intel software come out.

Recently I replaced my Jankinator 1000 with an Intel Arc A770 16GB card.  While this card is a 16GB card versus 24GB, it’s a lot faster and, well, it is not an NVIDIA card. Plus, I can do things like mixed precision processing and modify batch sizes to cope with the loss of 8GB.  I will spare you my thoughts on certain companies and their monopolies in Deep Learning systems.

I thought I would write up this post since, well, some Intel documentation is a bit scattered and is not the easiest to follow. Plus some of it will end up messing with your system if you are not careful. For reference, I’m running Linux Mint 22, which is based on Ubuntu 24.04 Noble.

So for the standard disclaimer, these instructions got everything working for me.  I make absolutely no guarantees that they will work for you.  If your house burns down or a portal opens and Cthulhu appears, don’t blame me.

Drivers

First off, make sure you are running kernel version 6.8.0-41 or later. In some earlier kernels, someone posted a patch that caused a regression in the compute engines on the Arc GPUs (https://github.com/intel/compute-runtime/issues/726). This has been fixed in more recent kernels on Ubuntu. If you are on Linux Mint like I am (and would highly recommend), you should have the latest HWE kernel. If not, go ahead and install it first.

Next we will follow some of these instructions comes from Intel’s documentation at https://github.com/intel/intel-extension-for-tensorflow/blob/main/docs/install/experimental/install_for_arc_gpu.md. Note that it does not currently mention Ubuntu 24.04, but trust me, it works. We will mostly follow their documentation to properly install the drivers, just with a few changes.

Core Drivers

First set up the gpg key for the Intel repo.

sudo apt-get install -y gpg-agent wget
wget -qO - https://repositories.intel.com/gpu/intel-graphics.key | sudo gpg --dearmor --output /usr/share/keyrings/intel-graphics.gpg

Now we install the Intel GPU repository. We differ from their instructions here because while the Nobel repository is not mentioned, trust me it is there.

echo "deb [arch=amd64 signed-by=/usr/share/keyrings/intel-graphics.gpg] https://repositories.intel.com/gpu/ubuntu noble unified" | sudo tee /etc/apt/sources.list.d/intel-gpu-noble.list
sudo apt-get update

Next you will need to install the proper packages.

apt install intel-opencl-icd libze1 intel-level-zero-gpu-raytracing intel-media-va-driver-non-free libmfx1 libmfxgen1 libvpl2 libegl-mesa0 libegl1 libegl1-mesa-dev libgbm1 libgl1-mesa-dev libgl1-mesa-dri libglapi-mesa libgles2-mesa-dev libglx-mesa0 libigdgmm12 libxatracker2 mesa-va-drivers mesa-vdpau-drivers mesa-vulkan-drivers va-driver-all vainfo hwinfo clinfo

This is another difference from the Intel documentation. libze1 has replaced intel-level-zero-gpu, although intel-level-zero-gpu-raytracing is still around. Also libegl1-mesa seems to have been renamed to libegl1 except for the dev package.

You should probably reboot now since the intel-media-va-driver-non-free driver contains some extra functionality that the fully open source version does not.

One API

Now we go ahead and follow their instructions for setting up the Intel One API repository.

wget -O- https://apt.repos.intel.com/intel-gpg-keys/GPG-PUB-KEY-INTEL-SW-PRODUCTS.PUB | sudo gpg --dearmor --output /usr/share/keyrings/oneapi-archive-keyring.gpg
echo "deb [signed-by=/usr/share/keyrings/oneapi-archive-keyring.gpg] https://apt.repos.intel.com/oneapi all main" | sudo tee /etc/apt/sources.list.d/oneAPI.list
sudo apt-get update

Here we also stray a bit from their documentation. I have found we need to install a LOT of packages from One API to make sure everything works, including their TensorFlow and PyTorch extensions.

sudo apt install intel-basekit

Yes that is a lot of packages, but you will need them eventually.

Now add these statements in your .bashrc to ensure that all the necessary environment variables are set:

# Intel stuff
source /opt/intel/oneapi/setvars.sh
source /opt/intel/oneapi/compiler/latest/env/vars.sh
source /opt/intel/oneapi/mkl/latest/env/vars.sh

Save your .bashrc file and now whenever you open a terminal you should see something like this:

:: initializing oneAPI environment ...
bash: BASH_VERSION = 5.2.21(1)-release
args: Using "$@" for setvars.sh arguments:
:: advisor -- latest
:: ccl -- latest
:: compiler -- latest
:: dal -- latest
:: debugger -- latest
:: dev-utilities -- latest
:: dnnl -- latest
:: dpcpp-ct -- latest
:: dpl -- latest
:: ipp -- latest
:: ippcp -- latest
:: mkl -- latest
:: mpi -- latest
:: tbb -- latest
:: vtune -- latest
:: oneAPI environment initialized ::

If you want, you can run clinfo to make sure OpenCL is working on the Arc.

bmaddox@sdf1:~$ clinfo
Number of platforms 2
Platform Name Intel(R) OpenCL
Platform Vendor Intel(R) Corporation
Platform Version OpenCL 3.0 LINUX
Platform Profile FULL_PROFILE
......
Platform Name Intel(R) OpenCL Graphics
Number of devices 1
Device Name Intel(R) Arc(TM) A770 Graphics
Device Vendor Intel(R) Corporation
Device Vendor ID 0x8086
Device Version OpenCL 3.0 NEO

I’ve abbreviated a lot of output, but you should see the Arc listed as a platform after running clinfo.

Congratulations!  The hardest part is now over.  Now it is time to get TensorFlow and PyTorch working with the Intel Arc GPU.

TensorFlow

Now we need to install Anaconda/Miniconda. This is because the most recent version of Python that the Intel TensorFlow and PyTorch extensions support is Python 3.11. You can find instructions on how to install conda from their websites.

Once you have it created, we will first work on the Intel TensorFlow extension.

conda create -n "tensorflowintel" python=3.11

or whatever you want to call your virtual conda environment. Activate that environment with:

conda activate tensorflowintel

Next we need to install the TensorFlow extension and TensorFlow itself.

pip install --upgrade intel-extension-for-tensorflow[xpu]

Make sure you specify the [xpu] at the end or else everything will end up using the CPU.

Now we verify that the Intel TensorFlow extension works. Run python to get into an interpreter and then type in the following:

(tensorflowintel) bmaddox@sdf1:~$ python
Python 3.11.9 (main, Apr 19 2024, 16:48:06) [GCC 11.2.0] on linux
Type "help", "copyright", "credits" or "license" for more information.
>>> import tensorflow as tf

Now, after running the import statement, you will see a lot of output. Ignore anything that mentions cuda since of course we are not going to install cuda without an NVIDIA card. You will see something like this:

2024-09-08 12:01:20.128862: I external/local_tsl/tsl/cuda/cudart_stub.cc:31] Could not find cuda drivers on your machine, GPU will not be used.
2024-09-08 12:01:20.401696: E external/local_xla/xla/stream_executor/cuda/cuda_dnn.cc:9261] Unable to register cuDNN factory: Attempting to register factory for plugin cuDNN when one has already been registered
2024-09-08 12:01:20.401756: E external/local_xla/xla/stream_executor/cuda/cuda_fft.cc:607] Unable to register cuFFT factory: Attempting to register factory for plugin cuFFT when one has already been registered
2024-09-08 12:01:20.451490: E external/local_xla/xla/stream_executor/cuda/cuda_blas.cc:1515] Unable to register cuBLAS factory: Attempting to register factory for plugin cuBLAS when one has already been registered
2024-09-08 12:01:20.557915: I external/local_tsl/tsl/cuda/cudart_stub.cc:31] Could not find cuda drivers on your machine, GPU will not be used.
2024-09-08 12:01:20.559102: I tensorflow/core/platform/cpu_feature_guard.cc:182] This TensorFlow binary is optimized to use available CPU instructions in performance-critical operations.
To enable the following instructions: AVX2 FMA, in other operations, rebuild TensorFlow with the appropriate compiler flags.
2024-09-08 12:01:21.568560: W tensorflow/compiler/tf2tensorrt/utils/py_utils.cc:38] TF-TRT Warning: Could not find TensorRT
2024-09-08 12:01:23.797012: W external/local_tsl/tsl/lib/monitoring/collection_registry.cc:81] Trying to register 2 metrics with the same name: /tensorflow/core/bfc_allocator_delay. The old value will be erased in order to register a new one. Please check if you link the metric more than once, or if the name is already used by other metrics.
2024-09-08 12:01:23.801616: W external/local_tsl/tsl/lib/monitoring/collection_registry.cc:81] Trying to register 2 metrics with the same name: /xla/service/gpu/compiled_programs_count. The old value will be erased in order to register a new one. Please check if you link the metric more than once, or if the name is already used by other metrics.
2024-09-08 12:01:23.814748: W external/local_tsl/tsl/lib/monitoring/collection_registry.cc:81] Trying to register 2 metrics with the same name: /jax/pjrt/pjrt_executable_executions. The old value will be erased in order to register a new one. Please check if you link the metric more than once, or if the name is already used by other metrics.
2024-09-08 12:01:23.814784: W external/local_tsl/tsl/lib/monitoring/collection_registry.cc:81] Trying to register 2 metrics with the same name: /jax/pjrt/pjrt_executable_execution_time_usecs. The old value will be erased in order to register a new one. Please check if you link the metric more than once, or if the name is already used by other metrics.
2024-09-08 12:01:24.959105: I itex/core/wrapper/itex_gpu_wrapper.cc:38] Intel Extension for Tensorflow* GPU backend is loaded.
2024-09-08 12:01:24.959972: I external/local_xla/xla/pjrt/pjrt_api.cc:67] PJRT_Api is set for device type xpu
2024-09-08 12:01:24.960001: I external/local_xla/xla/pjrt/pjrt_api.cc:72] PJRT plugin for XPU has PJRT API version 0.33. The framework PJRT API version is 0.34.
2024-09-08 12:01:25.106392: I external/intel_xla/xla/stream_executor/sycl/sycl_gpu_runtime.cc:134] Selected platform: Intel(R) Level-Zero
2024-09-08 12:01:25.106772: I external/intel_xla/xla/stream_executor/sycl/sycl_gpu_runtime.cc:159] number of sub-devices is zero, expose root device.
2024-09-08 12:01:25.107555: I external/xla/xla/service/service.cc:168] XLA service 0xac38370 initialized for platform SYCL (this does not guarantee that XLA will be used). Devices:
2024-09-08 12:01:25.107570: I external/xla/xla/service/service.cc:176] StreamExecutor device (0): Intel(R) Arc(TM) A770 Graphics, <undefined>
2024-09-08 12:01:25.109696: I itex/core/devices/gpu/itex_gpu_runtime.cc:130] Selected platform: Intel(R) Level-Zero
2024-09-08 12:01:25.110088: I itex/core/devices/gpu/itex_gpu_runtime.cc:155] number of sub-devices is zero, expose root device.
2024-09-08 12:01:25.110521: I external/intel_xla/xla/pjrt/se_xpu_pjrt_client.cc:97] Using BFC allocator.
2024-09-08 12:01:25.110541: I external/xla/xla/pjrt/gpu/gpu_helpers.cc:106] XLA backend allocating 14602718822 bytes on device 0 for BFCAllocator.
2024-09-08 12:01:25.112748: I external/local_xla/xla/pjrt/pjrt_c_api_client.cc:119] PjRtCApiClient created.

Pay attention to the last few lines. They should show that the Arc is detected and available. Next verify by running this:

>>> gpus = tf.config.list_physical_devices('XPU')
>>> for gpu in gpus:
...     print("Name:", gpu.name, " Type:", gpu.device_type)
...
Name: /physical_device:XPU:0 Type: XPU
>>>

If you run into any issues, you may have to import the Intel TensorFlow extension to make sure everything works (you will need it anyway if you are modifying existing sources)

>>> import intel_extension_for_tensorflow as itex
>>> print(itex.__version__)
2.15.0.2
>>>

Congratulations! You now have a virtual environment set up to work with TensorFlow. You can probably get this to work with existing source by making sure to downgrade the version of TensorFlow you use to the above and install the Intel extension. Then change references to GPU to XPU to make sure everything is using the Intel card.

PyTorch

Since we went through everything to get the drivers and TensorFlow working, we can now look at using the Intel PyTorch extension.  Note, I have found that it’s better to keep TensorFlow and PyTorch in separate environments.  That way you will be less likely to run into issues.

First off a couple of notes.  I am purposely not posting links to these sites because you should not go there.  Pain and sorrow will only come to you if you do.  If you go to the PyTorch website, they will mention rebuilding PyTorch so that it supports Intel XPU devices.  Do NOT do this.  Intel also has a website out there that mentions adding another repository to install PyTorch and some additional drivers.  Do NOT do this either.  Doing so will likely break everything.  Yes it is a little fragile at the moment, that is the whole reason I am writing this 🙂

We will again create a Python 3.11 environment using conda.

conda create -n "pytorchintel" python=3.11

Activate this environment with

conda activate pytorchintel

Now we install PyTorch into this environment:

python -m pip install torch==2.3.1 torchvision torchaudio==2.3.1 intel-extension-for-pytorch==2.3.110+xpu oneccl_bind_pt==2.3.100+xpu --extra-index-url https://pytorch-extension.intel.com/release-whl/stable/xpu/us/

Again run the Python interpreter and run the following to verify everything is working in this environment:

(pytorchintel) bmaddox@sdf1:~$ python3
Python 3.11.9 (main, Apr 19 2024, 16:48:06) [GCC 11.2.0] on linux
Type "help", "copyright", "credits" or "license" for more information.
>>> import torch
>>> import intel_extension_for_pytorch as ipex
>>> torch.xpu.is_available()
True

That is it!  You are now done!

As with TensorFlow, you will need to make some code changes for PyTorch to work.  Instead of sending the model to “GPU”, you will need to replace calls so they look like this:

model = model.to('xpu')
data = data.to('xpu')
model = ipex.optimize(model)

Conclusion

While it is a bit fragile now, I have had good luck with using my Arc A770 for deep learning and computer vision tasks.  Things like Stable Diffusion using OpenVino work REALLY well.  Other things work by removing and installing packages after you install their requirements and making some minor code modifications.  Intel has some really good documentation available online to port code to use their XPU devices and I highly suggest reading them before you start trying to run existing TensorFlow and PyTorch applications.

Applying Deep Learning to LiDAR Part 4: Detection

All of the previous parts of this series have talked about the challenges in training a CNN to detect geological features in LiDAR.  This time I will talk about actually running the CNN against the test area and my thoughts on how it went.

Detection

I was surprised at how small the actual network was.  The xCeption model that I used ended up only being around 84 megabytes.  Admittedly this was only three classes and not a lot of samples, but I had expected it to be larger.

Next, the test image was a 32-bit single band LiDAR GeoTIFF that was around 350 gigabytes.  This might not sound like much, but when you are scanning it for features, believe me it is quite large.

First off, due to the size of the image, and that I had to use a sliding window scan, I knew that the processing time would be long to run detections.  I did some quick tests on subsections and realized that I would have to break up the image and run detection in chunks.  This was before I had put a water cooler on my Tesla P40, and since I wanted to sleep at night, just letting it run to completion was out of the question.  Sleep was not the only concern I had.  I live south of the capital of the world’s last superpower, yet at the time we lost power any time it got windy or rained.  The small chunks meant that if I lost power, I would not lose everything and could just restart it on the interrupted part.

I decided to break the image up into an 8×8 grid.  This provided a size where each tile could be processed in two to three hours.  I also had to generate strips that covered the edges of the tiles to try to capture features that might span two tiles.  I had no idea how small spatially a feature could be, so I picked a 200×200 minimum pixel size for the sliding window algorithm.  This still meant that each tile would have several thousand potential areas to run detections against.  In the end it took several weeks worth of processing to finish up the entire dataset (keeping in mind that I did not run things at night since it would be hard to sleep with a jet engine next to you).

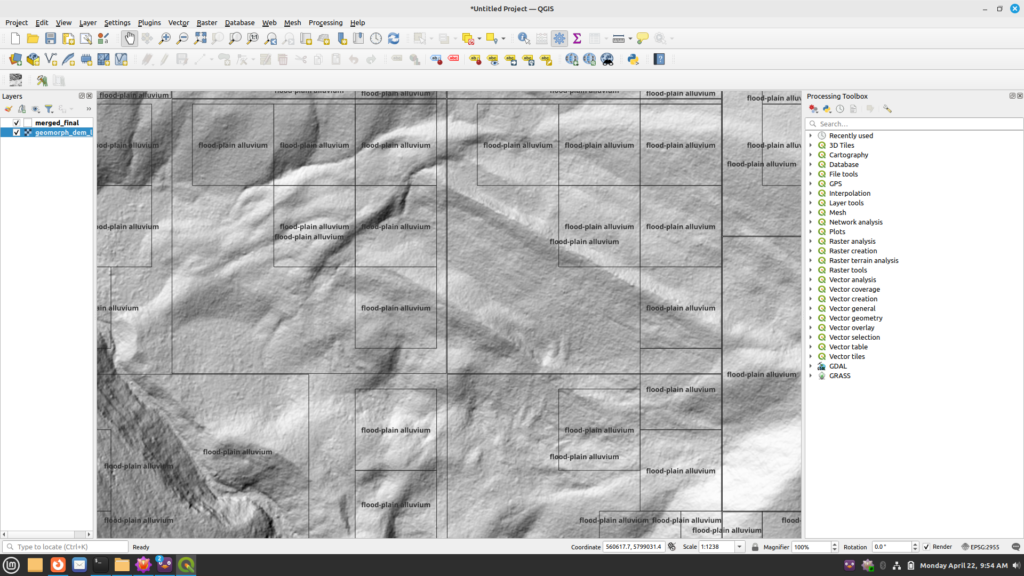
How well did it work?  Well, that’s the interesting part.  I’m not a geomorphologist so I had to rely on the client to examine it.  But here’s an example of how it looks via QGIS:

Sample of LiDAR detections.

As you can see, it tends to see a lot of areas as floodplain alluvium.  After consulting with the subject matter experts, there are a few things that stand out.

  1. The larger areas are not as useful as the smaller ones.  As I had no idea of a useful scale, I did not have any limitations to the size of the bounding areas to check.  However, it appears the smaller boxes actually do follow alluvium patterns.  The output detections need to be filtered to only keep the smaller areas.
  2. It might be possible to run a clustering algorithm against the smaller areas to better come up with larger areas that are correctly in the class.

Closing thoughts and future work

While mostly successful, as I have had time to look back, I think there are different or better ways to approach this problem.

The first is to train on the actual LiDAR points versus a rasterization of them.  Instead of going all the way to rasterization, I think keeping the points that represent ground level as inputs to training might be a better way to go.  This way I could alleviate the issues with computer vision libraries and potentially have a simpler workflow.  I am curious if geographic features might be easier for a neural network to detect if given the raw points versus a converted raster layer.

If I stay with a rasterized version, I think if I did it again I would try one of the YOLO-class models.  These models are state-of-the-art and I think may work better in scanning large areas for smaller scale features as it does its own segmentation and detection.  The only downside to this is I am not entirely sure YOLO’s segmentation would identify areas better than selective search due to the type of input data.

I think it would also be useful to revisit some of the computer vision algorithms.  I believe selective search could be extended to work with higher numbers of bits per sample.  Some of the other related algorithms could likely be extended.  This would help in general with remotely sensed data as it usually contains higher numbers of bits per sample.

While there are a lot of segmentation models out there, I am curious how well any of them would work with this type of data.  Many of them have the same limitations as OpenCV does and cannot handle 32-bits per sample imagery.  These algorithms typically images where objects “stand out” against the background.  LiDAR in this case is much different than the types of sample data that such images were trained on.  For example, here is a sample of OpenCV’s selective search run against a small section of the test data.  The code of course has to convert the data to 8-bits/sample and convert it to a RGB image before running. Note that this was around 300 meg in size and took over an hour to run on my 16 core Ryzen CPU.

You can see that selective search seems to have trouble with this type of LiDAR as there are not anything such as house lots that could be detected. The detections are a bit all over the place.

Well that’s it for now.  I think my next post will be about another thing I’ve been messing with: applying image saliency algorithms to LiDAR just to see if they’d pull anything out.

Applying Deep Learning to LiDAR Part 3: Algorithms

Last time I talked about the problems finding data and in training a machine learning model to classify geologic features from LiDAR.  This time I want to talk about how various libraries can (and cannot) handle 32-bit imagery.  This actually caused most of the technical issues with the project and required multiple work-arounds.

OpenCV and RasterIO

OpenCV is probably the most widely used computer vision library around.  It’s a great library, but it’s written to assume that the entire image can be loaded into memory at once.  To get around this, I had to use the rasterio library as it will read on demand and let you easily read in parts of the image at a time.  To use it with something like Tensorflow, you have to change the data with some code like this:

with rasterio.open(in_file) as src:
    # Read the data as a 3D array (bands, rows, columns)

    # Convert the data type to float32
    data = data.astype(numpy.float32)

    # Transpose the array to match the shape of cv2.imread (rows, columns, bands)
    data = numpy.transpose(data, (1, 2, 0))

    return data
        

Many computer vision algorithms are designed to expect certain types of images, either 8 to 16-bit grayscale or up to 32-bit three channel (such as RGB) images.  OpenCV, one of the most popular, is no different in this aspect .  The mathematical formulas behind these algorithms have certain expectations as well.  Sometimes they can scale to larger numbers of bits, sometimes not.

Finding Areas of Interest

This actually impacts how we search the image for areas of interest.  There are typically two ways to search an image using computer vision: sliding window and selective search.  A sliding window search is a technique used to detect objects or features within an image by moving a window of a fixed size across the image in a systematic manner. Imagine looking through a small square or rectangular frame that you slide over an image, both horizontally and vertically, inspecting every part of the image through this frame. At each position, the content within this window is analyzed to determine whether it contains the object or feature of interest.

Selective Search is an algorithm used in computer vision for efficient object detection. It serves as a preprocessing step that proposes regions in an image that are likely to contain objects. Instead of evaluating every possible location and scale directly through a sliding window, Selective Search intelligently generates a set of region proposals by grouping pixels based on similarity criteria such as color, texture, size, and shape compatibility.

Selective search is more efficient than a sliding window since it returns only “interesting” areas of interest versus a huge number of proposals that a sliding window approach uses.  Selective search in OpenCV is only designed to work with 24 bit images (ie, RGB images with 8 bits per channel).  To use higher-bit data with it, you would have to scale it to 8 bits/channel.  A 32-bit dataset (which includes negative values as these typically indicate no-data areas) can represent 2.15 billion distinct values.  To scale to 8 bits per channel, we would also need to convert it from floating point to 8-bit integer values.  In this case, we can only represent 256 discrete values.  As you can see, this is quite a difference in how many elevations we can differentiate. 

Here’s an example of the areas of interest that a sliding window and image pyramid generates. As you can see, there are a lot of regions of interest that are regularly placed across the image.

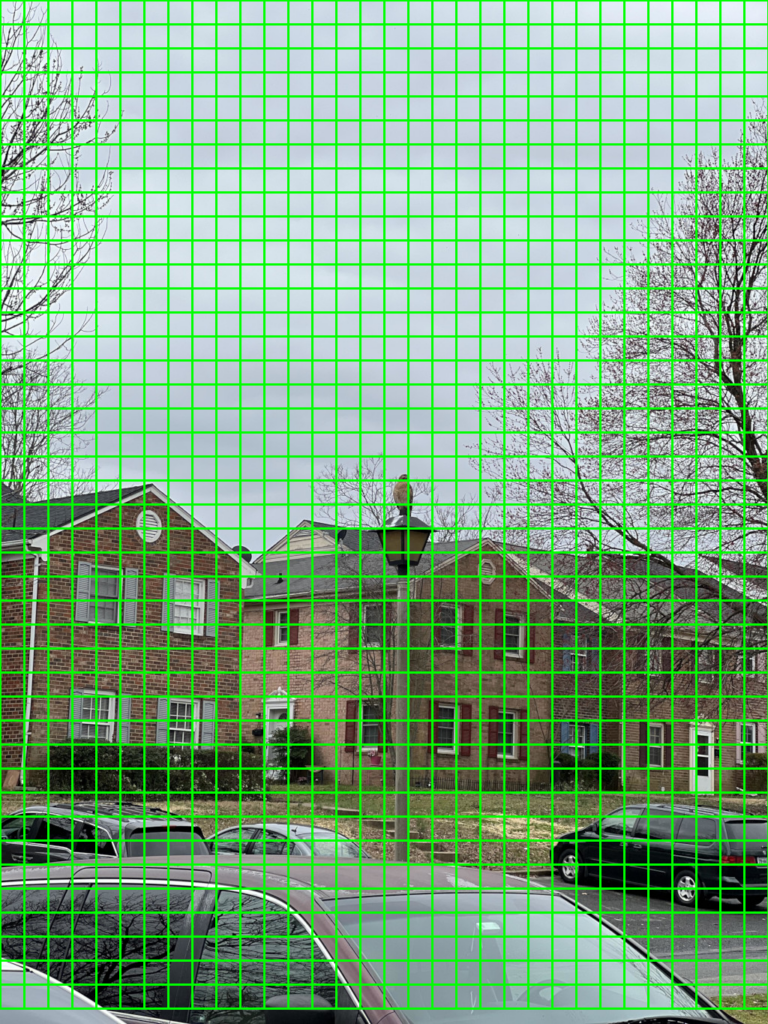
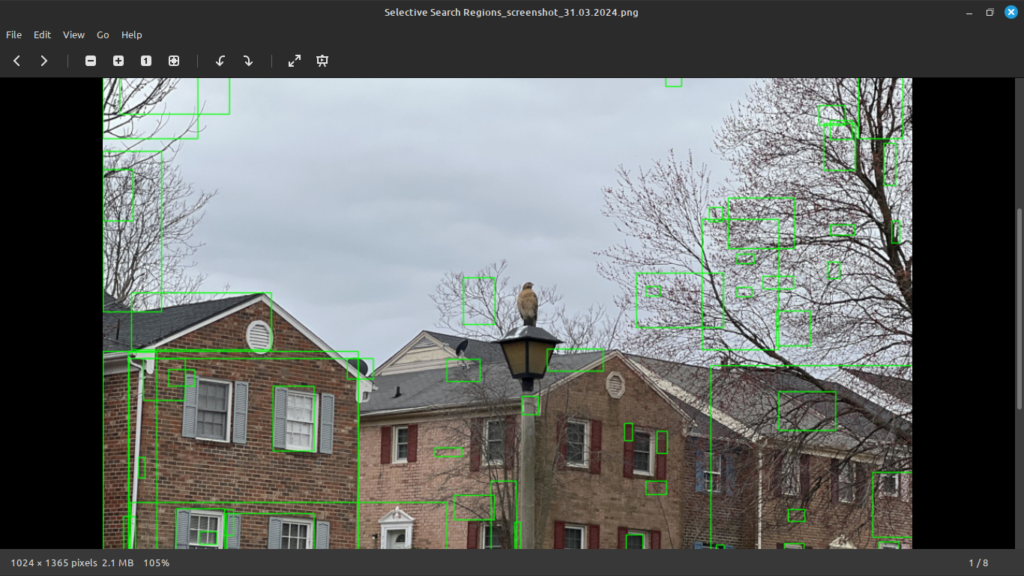
However, selective search is not always perfect.  Below is an example where I ran OpenCV 4’s selective search against an image of mine.  It generated 9,020 proposed areas to search.  I zoomed in to show it did not even show the hawk as a region of interest.

Selective search output run against an image with a hawk.

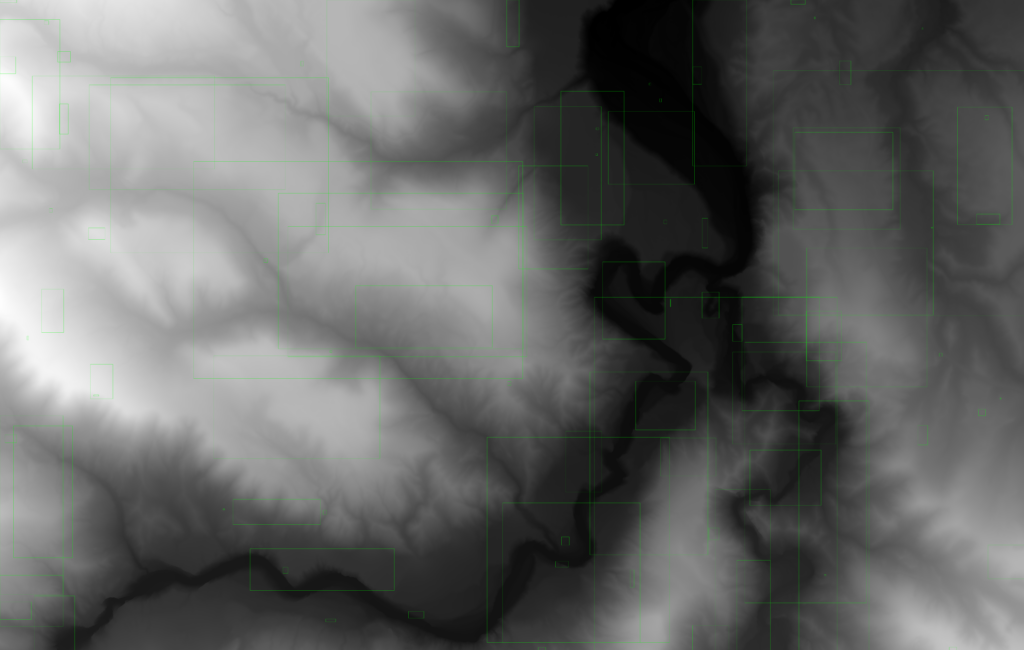
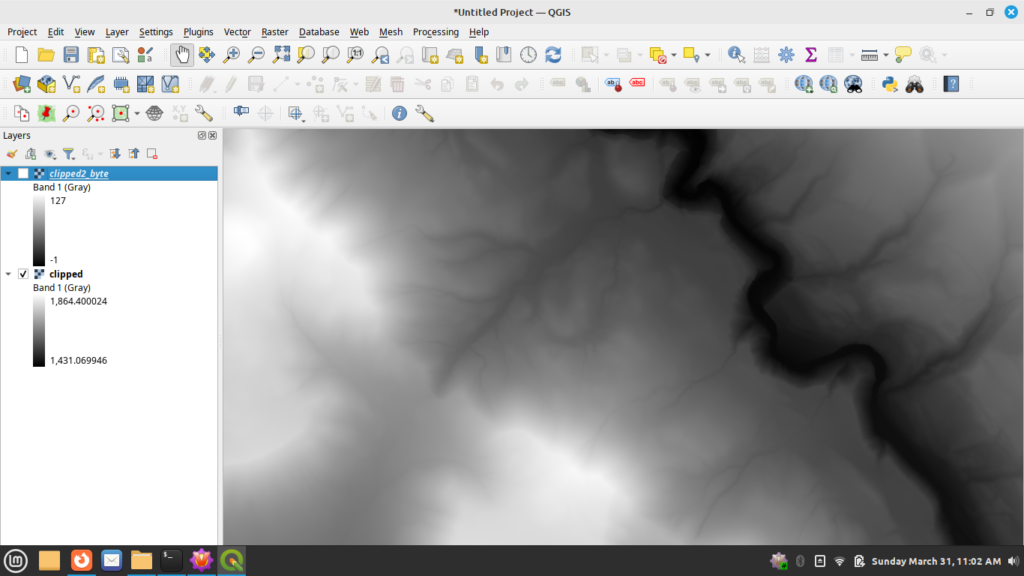
Here’s a clipped version of the input dataset when viewed in QGIS as a 32-bit DEM.  Notice in this case the values range from roughly 1,431 to 1,865.

QGIS with a clip of the original dataset.

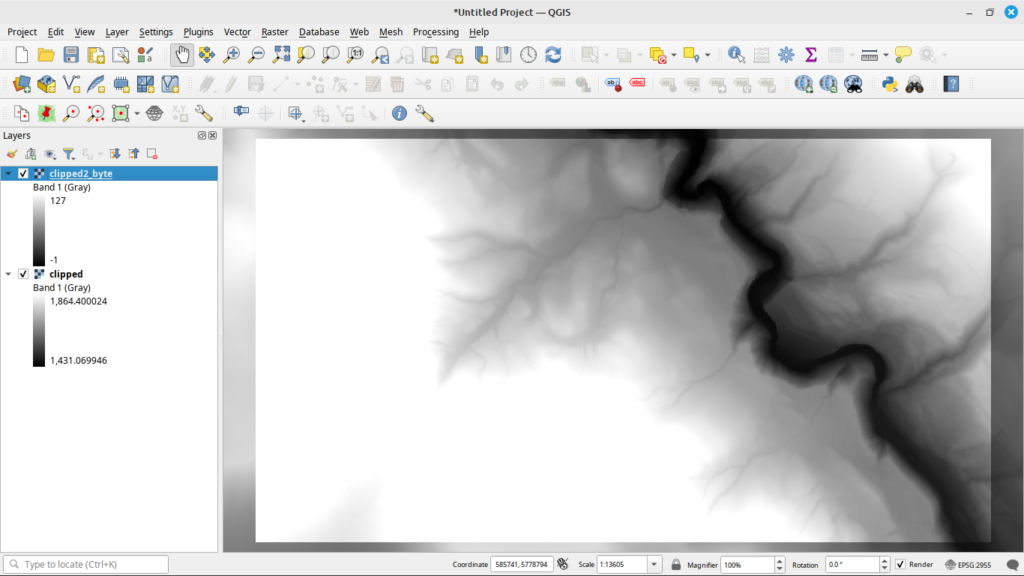
Now here is a version converted to the 8-bit byte format in QGIS.

Same data converted to byte.

As you can see, there is quite a difference between the two files.  And before you ask, int8 just results in a black image no matter how I try to adjust the no-data value.

Tensorflow tf.data Pipeline

So to run this, I set up a Tensorflow tf.data pipeline for processing.  My goal was to be able to turn any of the built-in Tensorflow models into a RCNN.  An interesting artifact of using built-in models, Tensorflow, and OpenCV was that the input data actually had to be converted into RGB format.  Yes, this means a 32-bit grayscale image had to become a 32-bit RGB image, which of course greatly increased the memory requirements.  Here’s a code snippet that shows how to use Rasterio, PIL, and numpy to take an input image and convert it so it’s compatible with the built-in Tensorflow models:

def load_and_preprocess_32bit_image(image_bytes: tensorflow.string) -> numpy.ndarray:
    """Helper function to preprocess 32-bit TIFF image
    Args:
       image_bytes (tensorflow.string): Input image bytes
    Returns:
        numpy.ndarray: decoded image
    """

    with rasterio.io.MemoryFile(image_bytes) as memfile:
        with memfile.open() as dataset:
            image = dataset.read()
    
    image = Image.fromarray(image.squeeze().astype('uint32')).convert('RGB')
    image = numpy.array(image)  # Convert to NumPy array
    image = tensorflow.image.resize(image, local_config.IMAGE_SIZE)

    return image

This function takes the 32-bit DEM, loads it, converts it to a 32-bit RGB image, and then converts it to a format that Tensorflow can work with.  

You can then create a function that can use this as part of a tf.data pipeline by defining a function such as this:


def load_and_preprocess_image_train(image_path, label, in_preprocess_input,
                                    is_32bit=False):
    """ Define a function to load, preprocess, and augment the images
    Args:
        image_path (_type_): Path to the input image
        label (_type_): label of the image
        in_reprocess_input: Function from keras to call to preprocess the input
        is_32bit (bool, optional): Is the image a 32 bit greyscale. Defaults to 
                                   False.

    Returns:
     _type_: Pre-processed image and label
    """

    image = tensorflow.io.read_file(image_path)

    if is_32bit:
        image = tensorflow.numpy_function(load_and_preprocess_32bit_image, 
                                          [image],
                                          tensorflow.float32)
    else:
        image = tensorflow.image.decode_image(image, 
                                              channels=3,
                                              expand_animations=False)
        image = tensorflow.image.resize(image, local_config.IMAGE_SIZE)
     
    image = augment_image_train(image)  # Apply data augmentation for training
    image = in_preprocess_input(image)

    return image, label

Lastly, this can then be set up as a part of your tf.data pipeline by using code like this:

# Create a tf.data.Dataset for training data
train_dataset = tf.data.Dataset.from_tensor_slices((train_image_paths, train_labels))
train_dataset = 
    train_dataset.map(lambda path, label:
        image_utilities.load_and_preprocess_image_train(path,
                                                        label,
                                                        preprocess_input,
                                             is_32bit=local_config.USE_TIF,
                                             num_parallel_calls=tf.data.AUTOTUNE)

(Yeah trying to format code on a page in WordPress doesn’t always work so well)

Note I plan on making all of the code public once I make sure the client is cool with that since I was already working on it before taking on their project.  In the meantime, sorry for being a little bit vague.

Training a Model to be a RCNN

Once you have your pipeline set up, it is time to load the built-in model.  In this case I used Xception from Tensorflow and used the pre-trained model to do transfer learning by the standard omit the top layer, freeze the previous layers, then add a new layer on top that learns from the input.

# Load the model without pre-trained weights
base_model = Xception(weights=local_config.PRETRAINED_MODEL, 
                      include_top=False, 
                      input_shape=local_config.IMAGE_SHAPE,
                      classes=num_classes, input_tensor=input_tensor)

# Freeze the base model layers if we're using a pretrained model

if local_config.PRETRAINED_MODEL is not None:
     for layer in base_model.layers:
         layer.trainable = False

# Add a global average pooling layer
x = base_model.output
x = GlobalAveragePooling2D()(x)

# Create the model
predictions = Dense(num_classes, activation='softmax')(x)
model = Model(inputs=base_model.input, outputs=predictions)

In this case, I used Adam as the optimizer as it performed better than something like the stock SGD and I added in two model callbacks.  The first saves the model to disk every time the validation accuracy goes up, and the second stops processing if the accuracy hasn’t improved over a preset number of epochs.  These are actually built-in to Keras and can be set up as follows:

# construct the callback to save only the *best* model to disk based on 
# the validation loss
model_checkpoint = ModelCheckpoint(args["weights"], 
                                   monitor="val_accuracy", 
                                   mode="max", 
                                   save_best_only=True,
                                   verbose=1)

# Add in an early stopping checkpoint so we don't waste our time
early_stop_checkpoint = EarlyStopping(monitor="val_accuracy",
                                      patience=local_config.EPOCHS_EXIT,
                                      restore_best_weights=True)

You can then add them to a list with

model_callbacks = [model_checkpoint, early_stop_checkpoint]

And then pass that into the model.fit function.

After all of this, it was a matter of running the model.  As you can imagine, training took several hours.  Since this has gotten a bit long, I think I’ll go into how I did the detection stages next time.

How should we be using ChatGPT?

Large-language model (LLM) systems like ChatGPT are all the rage lately and everyone is racing to figure out how to use them. People are screaming that LLMs are going to put them out of jobs, just like the Luddite movement thought so many years ago.

A big problem is that a lot of people do not understand what things like ChatGPT are and how to use them effectively. Things like ChatGPT rely on statistics. They are trained on huge amounts of text and learn patterns from that text. When you ask them a question, they parse through it and then see what patterns they learned that statistically appear to be the most relevant to your input and then generate output. ChatGPT is a tool that can be effective at helping you to get things done, as long as you keep a few things in mind while using it.

You should already know something about your question before you ask.

Nothing is perfect, and neither are large-language models. You should know something about the problem domain so that you can properly interpret the output you get. LLMs can suffer from what is termed hallucination, where they will blissfully answer your question with incorrect and made-up information. Again, their output is based on statistics, and they’re trained on information that has some inherent biases. They do not understand what you are asking like another human would. You need to check the answer to determine if it is correct.

If you are a software developer, this is especially true when asking ChatGPT to write code for you. There are plenty of examples online of people going back and forth with it until they get working code. My own experience is that it has major issues with the Python bindings for GDAL for some reason.

Be clear with what you ask

ChatGPT uses natural language parsing and deep learning to process your request and then try to generate a response that is statistically relevant. Understand that getting good information out of a LLM can be a back and forth, so the clearer you are, the better it can process what you are asking. Do not ask something like “How do I get rich?” and expect working advice.

Be prepared to break down a complex question into smaller parts

You will not have much luck if you ask something like “Tell me how to replace the headers in my engine” and get complete and specific advise. A LLM does not understand the concept of how to do something like this, so it will not be able to give you a complete step-by-step list (unless some automobile company tries to make a specific LLM). Break down complex questions into smaller parts so that you can combine all the information you get at the end.

Tell it when it is wrong

This is probably mainly important for software developers, but do not be afraid to tell ChatGPT when it is wrong. For example, if you ask it to write some source code for you, and it does not work, go back and tell it what went wrong and what the error was. ChatGPT is conversational, so you may have to have a back and forth with it until it gives you information that is correct.

Ask it for clarification

The conversational nature of ChatGPT means that if you do not understand the response, you can ask it to rephrase things or provide more information. This can be helpful if you ask it about a topic you do not understand. Asking for clarification can also help you to judge whether you are getting correct information.

NEVER GIVE IT PERSONAL INFORMATION

Do NOT, under any circumstances, give ChatGPT personal information such as your social security number, your date of birth, credit card numbers, or any other such information. Interactions with LLMs like ChatGPT are used for further training and for tweaking the information it presents. Understand that anything you ask ChatGPT will permanently become part of its training set, so in theory someone can ask it for your personal information and get it if you provide it.

Takeaways

ChatGPT is a very useful tool, and more and more LLMs are being released on an almost weekly basis. Like any tool, you need to understand it before you use it. Keep in mind that it does not understand what you are asking like a human does. It is using a vast pool of training data, learned patterns, and statistics to generate responses that it thinks you want. Always double check what you get out of it instead of blindingly accepting it.

Finally Upgraded!

If you’ve been trying to come here over the past few days, you might have noticed that this blog has been up and down, changing themes, and what not. I have been having issues upgrading the PHP version on this website and finally got things ironed out thanks to my provider’s awesome support staff! So I promise it should be back to normal now. Mostly. Probably. 😉

Image Processing Basics Part 2

Some Examples

Now that we have some of the basics down, let us look at some practical examples of the differences between how the brain sees things versus how a computer does.

Example image of a clear blue sky

The above photo of a part of the sky was taken by my iPhone 13 Pro Max using the native camera application. There were no filters or anything else applied to it. To our eyes, it looks fairly uniform: mainly blue with some lighter blue towards the right where the sun was the day I took the picture. Each pixel of the image represents the light that hit a sensor in the camera, was processed, and saved.

Our brain does not see a number of individual pixels. Instead, we see large splotches of colors. This is one of the shortcuts our brain does to ease the processing burden. If you look around a room, you do not see individual differences between the colors of the wall. Your wall mainly looks like a uniform color. We simply do not have the processing power to break down the inputs from our eyes into every minute part.

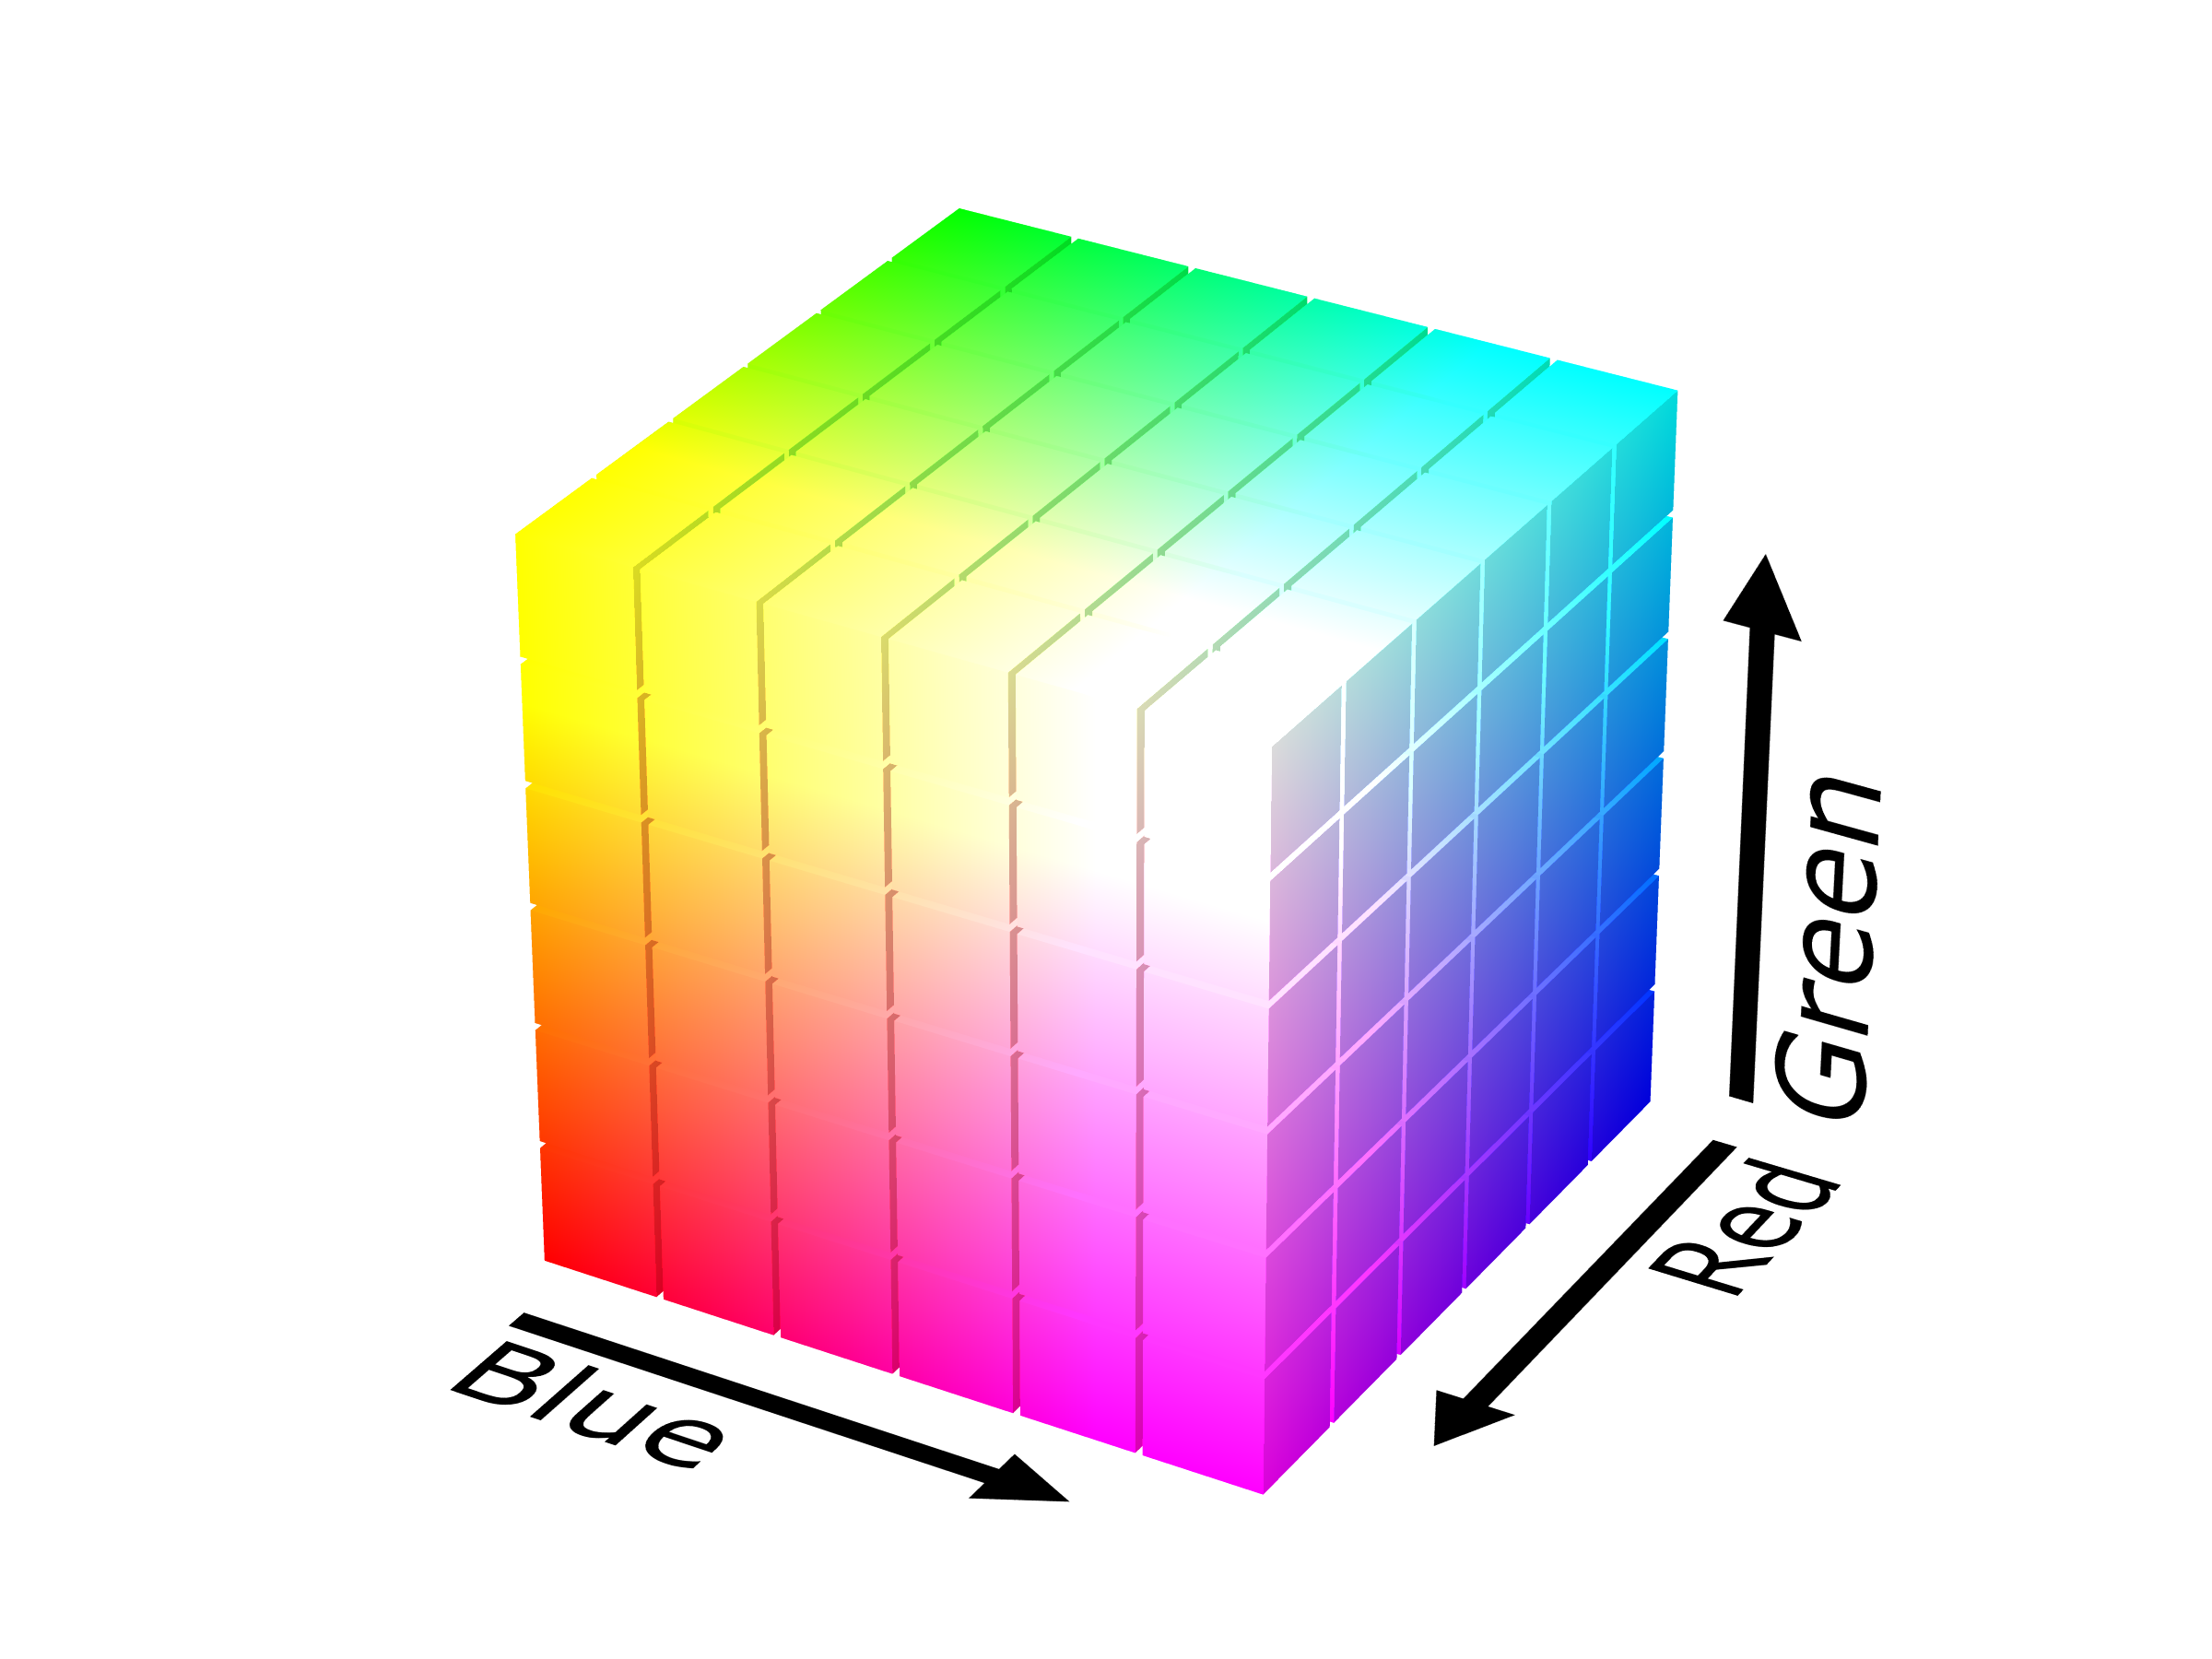
A computer, however, does have the ability to “see” an image in all of its different parts. Computers see everything as a number, be it the 1’s and 0’s of binary or color triplets in the RGB color space. If we look at the RGB color cube below, the computer sees all of the pixels in the above image as clustering somewhere around the lower right side of the cube. See the previous link for more information about the RGB color space.

RGB Color cube from wikipedia
RGB Color Cube (Wikimedia Commons contributors, “File:RGB color solid cube.png,” Wikimedia Commons, https://commons.wikimedia.org/w/index.php?title=File:RGB_color_solid_cube.png&oldid=656872808 (accessed April 18, 2023).

In a computer, the above image is loaded and each pixel is in memory in the form of triplets such as (135, 206, 235), which is the code for a color known as sky blue. The computer also does not have to take any shortcuts when it loads the image, meaning that the representation in memory is exactly the same as the image that was saved from the phone.

If we use the OpenCV library to calculate the histogram of the image and then count the number of colors, we in fact find that there are 2,522 unique colors in the picture of the sky. There is no magic here, we just do not have the same precision that a computer does when it comes to examining images or our environment. The big take away here is this: there is more information encoded in pictures or video than what our brains are capable of perceiving. Just because we cannot see certain details in a image does not mean that they are not there.

For another example, consider this image below. The edges look like nothing but black, and all you can really see is out of the window. It is definitely underexposed.

Photo out the window of my wife's grandparents' house.
Photo out the window of my wife’s grandparents’ house.

As mentioned above, a computer is able to detect more than our eyes can. Where we just see black around the edges, there is in fact detail there. We can adjust the exposure on the image to brighten it so that our eyes can see these details.

Above image with the exposure and contrast adjusted

With the exposure turned up (and adjusting the contrast as well), we can additionally see a picture of a bird, some dishes, and some cooking implements. This is not magic, nor is it adding anything to the image that was not already there. Image processing like this does not insert things into an image. It only enhances the details of an image so that they are more detectable to the human eye.

Many times, when image processing is in the news, people sometimes assume that it changing an image, or that it is inserting things that were not originally there. When you edit your images on your phone or tablet, you are manipulating the detail that is already in the image. You can enhance the contrast to make the image “pop.” You can change the color tone of the image to make it appear more warm or more cold to your liking. However, this is simply modifying the information that is already in the image to change how it appears to the human eye.

I am making a big deal about this point as future installments in this series will demonstrate how things actually work while hopefully dispelling certain myths that exist in pop culture. I think next time I will cover zooming in or out of an image (aka, resizing). Does it add something into the image or misrepresent it? We will find out.

When Checkinstall Attacks

The other day I was compiling the latest OpenCV on my computer and had planned on doing what I normally do when it’s done: run checkinstall to build a .deb for it because I like to keep all my files under package management. OpenCV finished compiling fairly quickly (it’s nice when you can do a make -j 16) and I then ran checkinstall.

It crashed while it was running and left a half-installed Debian package of OpenCV on my system. “No problem” I thought, I’ll just uninstall the deb and do a normal make install. Sometimes checkinstall crashes so I didn’t think anything was out of the ordinary. Since I usually put it in /opt/opencv4 it would still be self contained at least.

I noticed a little bit later that my system was acting oddly. Some things wouldn’t run, I couldn’t sudo any more, etc. I rebooted as a first check to see if it was just something random going on. And that’s when my system rebooted to a text mode login prompt. “Huh, maybe the card/drivers didn’t initialize fully I’ll just reboot again.” Nope, no joy still the text login.

I tried to login only to watch the process pause after I typed my password, and then came back up the login prompt. “Odd, maybe I’ll see if it’s something weird and try another virtual console.” Nope, no joy there. Tried to ssh into it, no joy there either. I was worried my SSD was going out. It’s not that old, but still a worry.

So I used my laptop to make a bootable Mint installer and plugged that in and tried to boot. The graphics screen was corrupted and had to use safe mode to log in. “Holy crap, is my graphics card messed up along with the hard drive?” I was worried about this because a new power supply I bought a while back had nuked my old motherboard so had to replace hardware in my system. (That’s a story for another day).

I could still get a GUI when I booted into safe mode from the thumb drive so assumed the open source drivers on the latest Mint installer just didn’t like my card unless I did safe mode.. I did a SMART test to make sure nothing was wrong with the drive. That worked so I ran a fsck to check the integrity of the drive. I then went to set up a chroot to the hard drive so I could run debsums to make sure the packages hadn’t gotten randomly corrupted. And then I noticed a problem.

I couldn’t set up the chroot to work. I kept getting an error about /bin/bash not existing. I checked the /bin directory on the hard drive and sure enough, it was empty save for a broken link to some part of the JDK. “That’s odd, there were no drive errors but /bin is empty.” I thought about things for a moment and it randomly did an ls -ld on the root of the hard drive but didn’t see anything at first.

Then hit it me: “Wait a minute, /bin is supposed to be a link to /usr/bin these days.” I realized that for whatever reason, it looked like checkinstall had replaced the link for /bin with an actual /bin and had randomly placed a link in there for the jdk. I deleted the directory and replaced the link to /usr/bin and rebooted. Boom, system booted normally. Well, mostly normally. CUDA had somehow disappeared from the drive and I had to reinstall it (didn’t use the packages from nVidia since they want to downgrade my video drivers so just did a local install). I ran debsums to check and everything verified properly.

The moral of the story is, it’s good to have debugging skills and know how your computer is supposed to work!