I’ll admit it, I really like old maps. I especially like old topographic maps. I think it started when I used to work for the US Geological Survey. To me, it’s interesting to see how things change over time. From my old urban grown prediction days, I like to see where and when populations change.
Since the USGS put out their Historical Topographic Map Collection (HTMC), I’ve been playing with the maps off and on for about a year now. I finally decided to start merging available maps of the same scale and vintage to study and possibly do feature extraction down the road. I’ll be placing them for download here in case anyone is interested as I process them.
I thought I’d share how I put them together in case anyone else is interested. The first step is to go to the USGS website and pick the files you want to use. The files there are available in GeoPDF format. First thing you need to understand is that you may not find a map covering your area of interest at your scale of interest and vintage. Not everything managed to survive to the current day. For example, I made a merged 125K map of Virginia and most of southern VA is missing at that resolution.
Once I download the GeoPDFs I want to work on, I use a modified version of the geopdf2gtiff.pl script from the Xastir project. The link to my modifications can be found here. I use LZW compression for my GeoTIFFs as it’s lossless and keeps the quality from the GeoPDFs. It is a Perl script and requires that you have GDAL and the GDAL API installed. What it does is calculate the neat-lines of the GeoPDF and then clips it to the neat-line while converting it to a GeoTIFF. Running it as as simple as:
geopdf2gtiff.pl inputfile.pdf
Once you have all of your GeoPDF files download and converted, the next step is to merge them. The fastest way I’ve found to merge involves using gdalbuildvrt and gdal_translate, also from GDAL. The first step is to create a virtual dataset of all of your files by running something like:
gdalbuildvrt -resolution highest -a_srs EPSG:4326 merged.vrt parts/*.tif
The options I chose here are to pick the highest pixel resolution (-resolution) based on the input files. For this case the resolutions should be the same, but this way I don’t have to go through and verify that. Next I change the projection of the output file to WGS84 (-a_srs). Next is the file name of the virtual dataset and then the input files.
Now that the virtual dataset is done, it’s time to actually merge all of the files together. The virtual dataset contains the calculated bounding box that will contain all of the input files. Now we use gdal_translate to actually create the merged GeoTIFF file:
gdal_translate -of GTiff -co COMPRESS=LZW -co PREDICTOR=2 merged.vrt ~/merged.tif
Here again I use LZW compression to losslessly compress the output data. Note that gdal_translate will automatically add an Alpha channel as Band 4 in the image to denote areas that had no input data. That’s why we do NOT add the -addalpha flag to gdalbuildvrt. For performance tips, I’d suggest keeping the source data and output file on separate drives unless you’re running something like a solid state drive. To give you an idea of the output file sizes, Virginia merged (which did have a lot of areas missing), was around 500 megabytes.
Next you’ll need a Shapefile to use as a cut file to clip the data. Since I have the Census Tiger 2013 data in a local PostGIS database (see previous posts to this blog), I used QGIS to select just the VA state outline and then saved it as a Shapefile.
Finally, we will use gdalwarp to clip the merged GeoTIFF against the state outline to produce the clipped GeoTIFF that is just the state itself. This operation can take a bit of time depending on how powerful a machine you’re running it on. The command you will use is similar to this:
gdalwarp --config GDAL_CACHEMAX 1024 -wm 1024 -cutline va_outline.shp -crop_to_cutline -multi -t_srs EPSG:4326 -co COMPRESS=LZW -co PREDICTOR=2 -co BIGTIFF=YES -co TILED=YES ~/merged.tif clipped.tif
Some of the command line parameters I used are optional, I just tend to leave them in since I do a lot of copying and pasting 😉 First we tell GDAL to increase the size of its caches using the –config GDAL_CACHEMAX and -wm options. Next we specify the file to clip against with the -cutline and -crop_to_cutline options. The -multi option tells GDAL to process using multiple threads. I again specify the output projection and the LZW compression parameters. Here I also specify the BIGTIFF option just in case the output file goes over four gigabytes. Finally, I tell gdalwarp to tile the output TIFF so it will load faster in a GIS by separating it into tiles.
The output will look something like the below figure. I’ll start posting files as I get time. Hope everyone is having a great holiday!
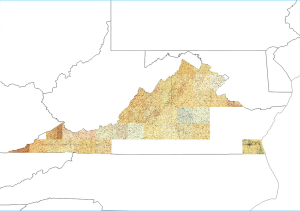
Clipped Virginia 125K Old Maps